Crowdsourcing Platform
About The Project
This web app is a crowdsourcing platform that aims to create open datasets to develop Speech Recognition, Text-to-Speech, Machine Translation and Optical Character Recognition for Indian languages. This will empower our technologists, language enthusiasts and language communities to build world class digital applications in our own local languages. It can be used to crowdsource audio and validate them for various languages.
It comprises four initiatives: Speech Contribution: It creates a repository of diverse voices speaking Indian languages, where volunteers record their voice by reading a text. They can also choose to validate the audio and corresponding text of other volunteers. Speech Validation: It creates an open dataset through transcription of audio files. Volunteers can validate the transcriptions for audio files in different languages. Translation Validation: It creates open parallel translation datasets between corresponding sentences in two languages. Volunteers validate these translations. Image Validation: It creates an open data repository of images and the corresponding text. Similar to other initiatives, volunteers can validate the labels against the image.
The application makes use of NodeJs, Postgres for Database. It can be hosted on any cloud platform. The current application has code to support AWS and GCP as providers to store the recorded information. Crowdsourcing Platform’s developer documentation is meant for its adopters, developers and contributors.
The developer documentation helps you to get familiar with the bare necessities, giving you a quick and clean approach to get you up and running. If you are looking for ways to customize the workflow, or just breaking things down to build them back up, head to the reference section to dig into the mechanics of Crowdsourcing Platform.
Data Collection Pipeline is based on an open platform, you are free to use any programming language to extend or customize it but we prefer to use python to perform smart scraping.
The Developer documentation provides you with a complete set of guidelines which you need to:
- Install dependencies for the Crowdsourcing Platform
- Configure Crowdsourcing Platform
- Customize Crowdsourcing Platform
- Extend Crowdsourcing Platform
- Contribute to Crowdsourcing Platform
Built With
We have used Node.js to build this platform.
Architecture
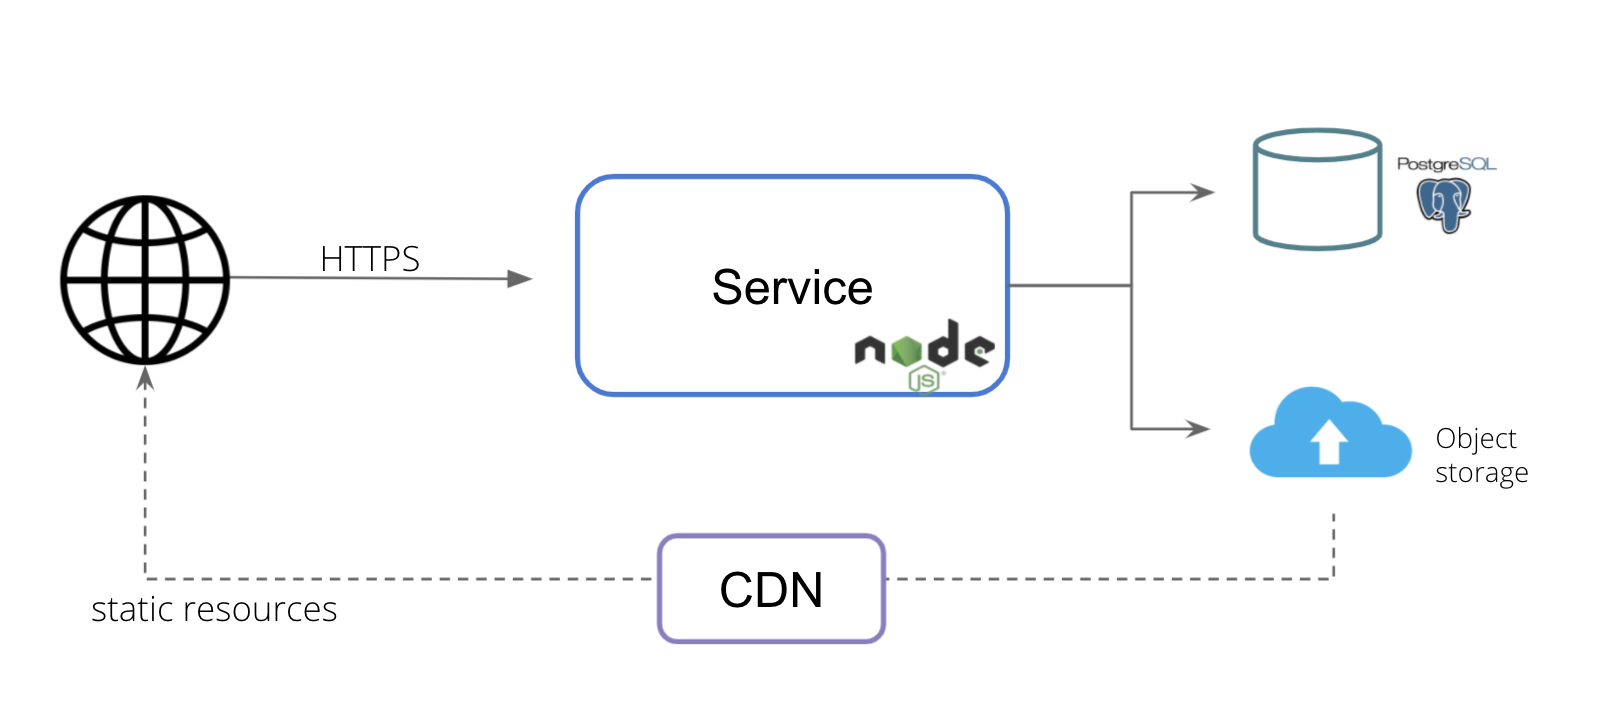
Logical Architecture
The logical architecture is 3 layered with UI layer implemented using EJS templates, Service layer is implemented in Javascript which run on Nodejs server and storage layer which has RDBS and Object Storage
Cloud Agnostic Architecture: Kubernetes
This the architecture for deployment on Kubernetes, wherein the service layer is scalable leveraging K8s capabilities. 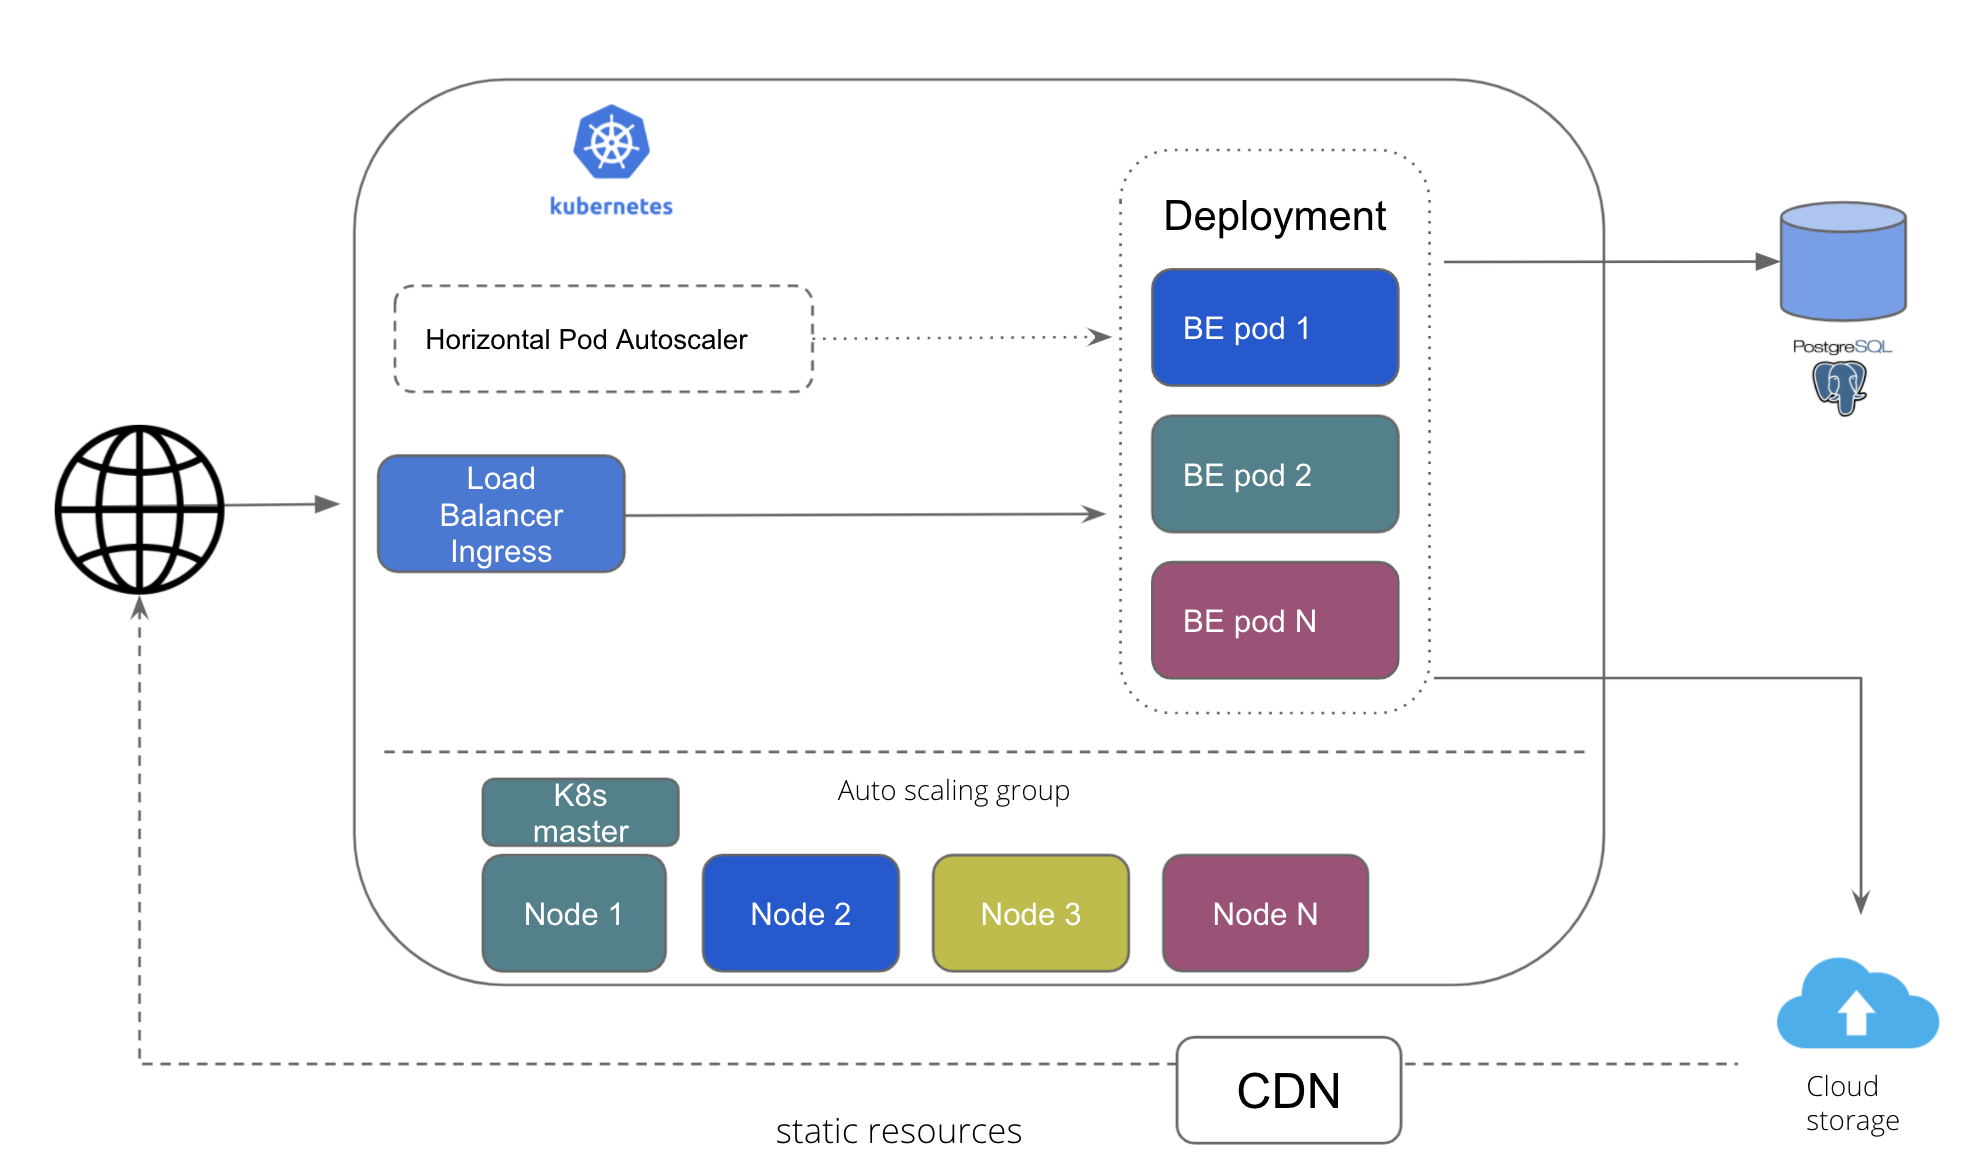
Deployment Architecture: AWS
This is the deployement architecure for running portal on AWS infra. It leverages AWS manages services like EKS and Fargate for K8s cluster and AWS RDS for managed database. It also uses AWS managed Load Balancer 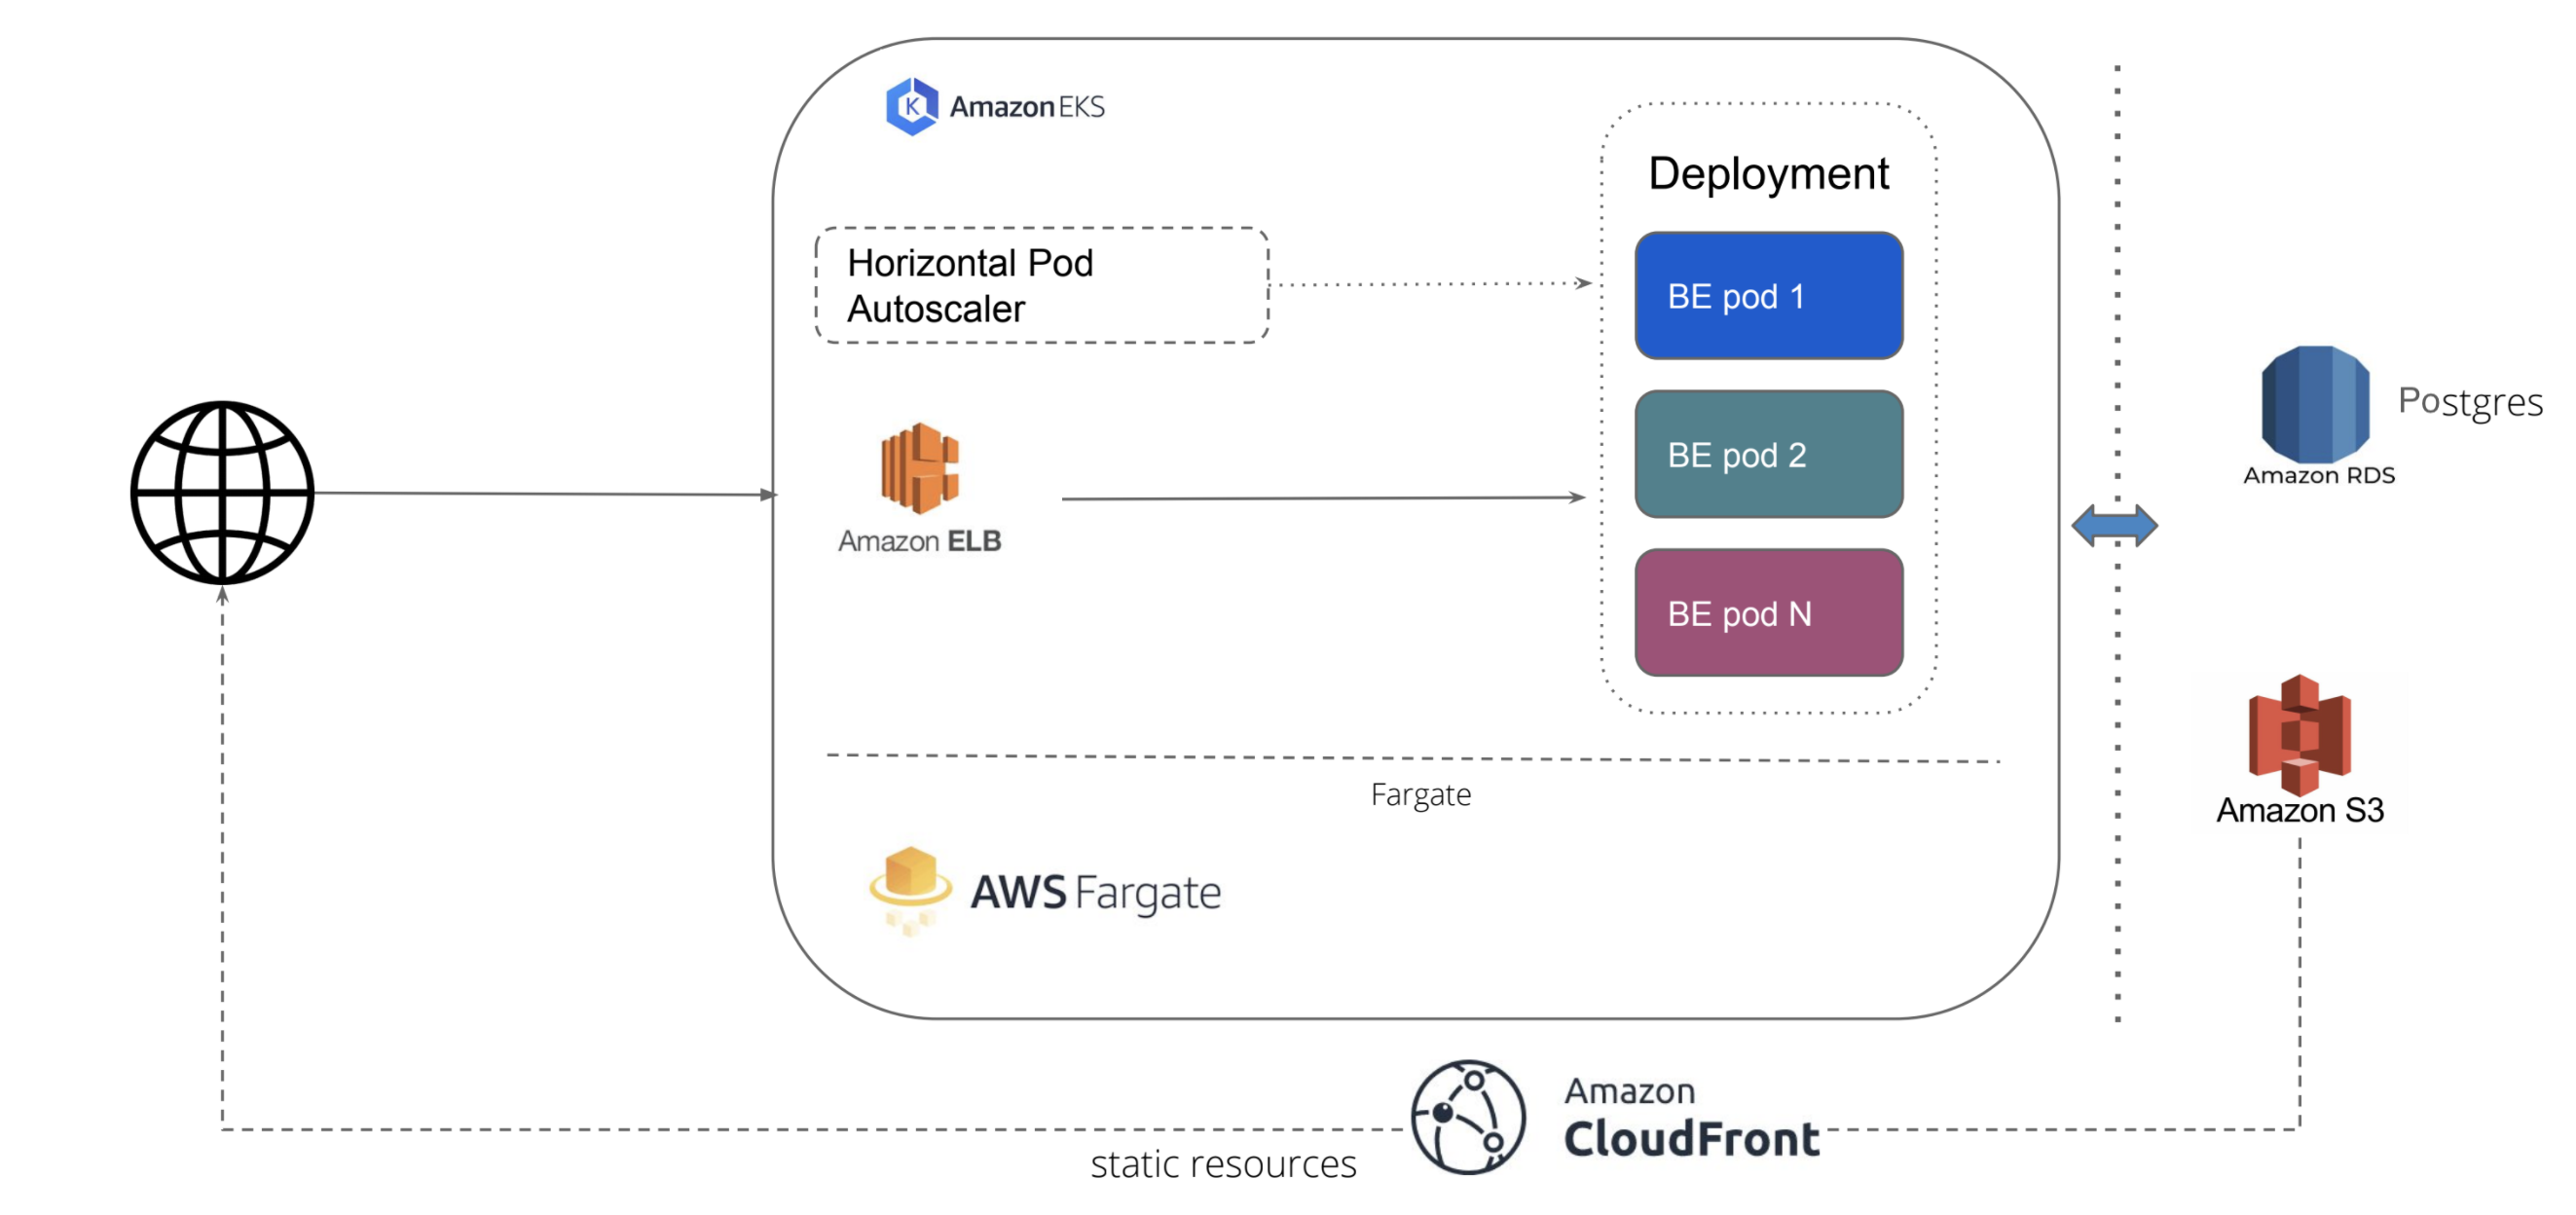
Architecture Improvements
We believe in continously improving the architecture. Here are some ADR opened : Architecture Decision Records
Proposed Architecture: 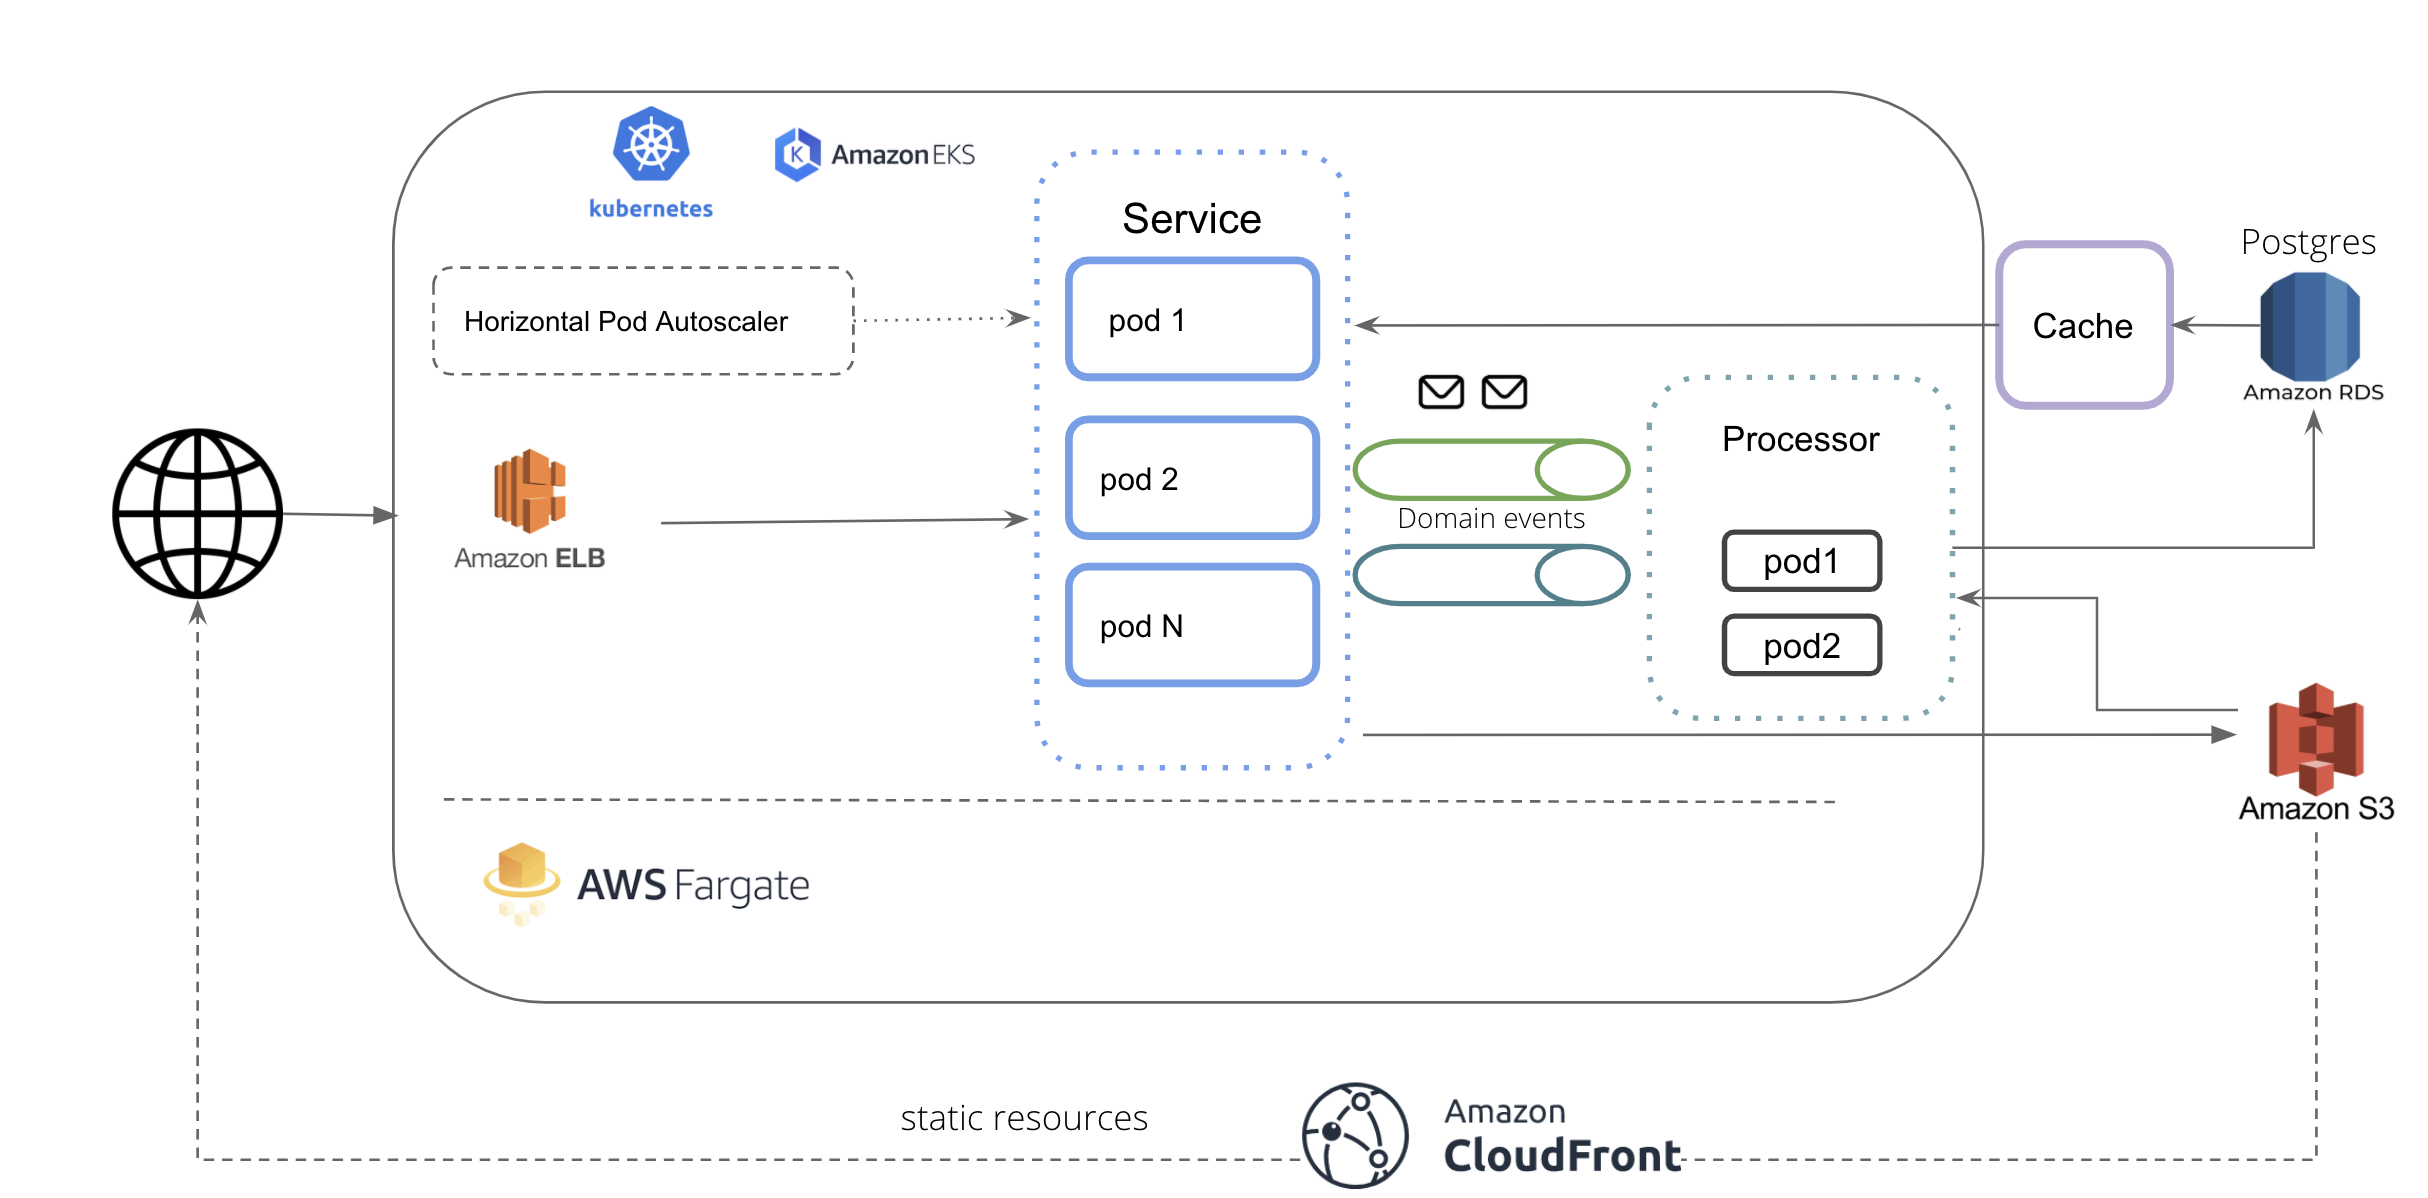
Languages and Tools
Dashboard Design
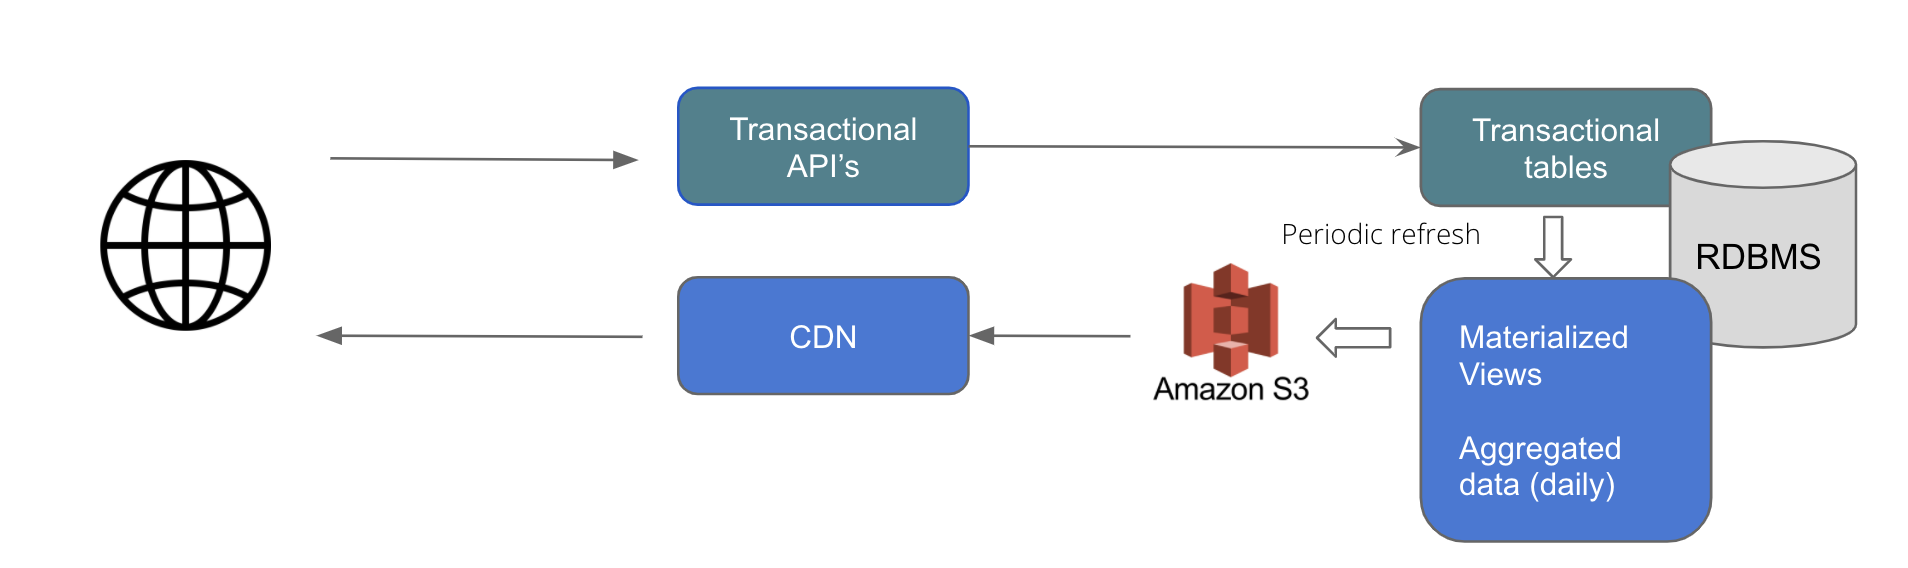
- The transactional tables and view tables are kept separate.
- Materialized views are used which holds the data as well. This avoids on the fly computations for aggregation for each query.
- The materizaled view are refreshed every 4 hours
- As a part of the refresh job, the aggregated data is dumped as json that is be served directly via CDN.
Advantages:
- Faster reads: Separate view with only 365 aggregated data points per year.
- Less overhead on DB as data queried is on a very small data set and served from S3 buckets
- Transactional tables are optimized for faster writes as we have separate views for reads
- Simplified read queries as complexity is abstracted in views
- AWS RDS managed DB. Can be scaled horizontally and vertically easily if required in future.
UI Details
Tech Stack : React, NextJs, HTML, CSS
Libraries :
| Libraries | Name | Type | License |
|---|---|---|---|
| Chart | Amcharts 4 | Free version | linkware license |
| Keyboard | react-simple-keyboard | Open Source | MIT |
| Fonts | Lato, Helvetica, sans serif | Google fonts (Open Source) | OFL |
| Bootstrap | Bootstrap | Open Source | MIT |
| React Class | Classnames | Open Source | MIT |
| Blob | get-blob-duratio | Open Source | MIT |
| jspdf | Open Source | MIT | |
| Date & Time | moment | Open Source | MIT |
| platform | platform | Open Source | MIT |
| Localisation | next-i18next | Open Source | MIT |
| Image | sharp | Open Source | MIT |
| react-slick | react-slick | Open Source | MIT |
| swr | swr | Open Source | MIT |
| js-levenshtein | js-levenshtein | Open Source | MIT |
| word-error-rate | word-error-rate | Open Source | MIT |
Frontend for Crowdsourcing Platform.
Features
- Supports these browsers and features.
Development
- Make sure your following requirements for npm and node are met:
| Package | Version |
|---|---|
| npm | 6.14.14 |
| node | 14.17.5 |
If you are using nvm, you can run nvm use in the root directory to install the correct version of node.
- Open your favorite Terminal and run these commands:
npm install

npm run dev

# Local dev server will automatically starts on http://localhost:8080
Available Scripts
In the project directory, you can run:
npm run clean
Clean up cached or build folders.
npm run dev
Runs the app in the development mode.
Open http://localhost:8080 to view it in the browser.
The page will reload if you make edits.
npm run dev:axe
Similar to npm run dev but also runs @axe-core/react.
npm run lint
For running eslint on source code.
npm run lint:fix
For fixing eslint errors.
npm run stylelint
For running stylelint on source code.
npm run stylelint:fix
For fixing stylelint errors.
npm run format
For running prettier on the source code.
npm run typecheck
For running typescript typecheck.
npm run test
Launches the test runner in the interactive watch mode.
npm run test:coverage
Launches the test runner with coverage.
npm run test:lh-ci
For running lighthouse-ci. Please ensure you ran npm run build first before running this command.
npm run node-talisman
For running talisman on the source code.
npm run check
For running lint, stylelint, typecheck, test with coverage and talisman.
npm run build
Builds the app for production to the .next folder.
npm run build:docker
Same as npm run build but for docker.
npm start
It will start the production server on http://localhost:8080. Please ensure you ran npm run build first before running this command.
npm run start:docker
It will start the production server on http://localhost:3000 for docker. Please ensure you ran npm run build:docker first before running this command.
Auto Validation
Auto Validation feature validates and warns the users in case their inputs are detected to be different from what actual data should be. It is done by comparing the user input to a machine generated output and validated against a set threshold limit for every initiative. When Auto Validation is enabled for the application, user inputs during the validation are screened depending upon the threshold set for each language in their respective initiatives.
For each initiatives, scores are calculated with user input and the machine generated output. If the scores do not pass the required threshold, the system displays a message on the application screen asking the user to double check their input. In case the users go ahead and submit their input despite the message, the response input is flagged and not validated further.
- Types of scores calculated for initiatives:
- ASR - WER (Word Error Rate)
- OCR - Levenstein method
- Parallel - BleuScore method
The Text Initiative currently does not support auto validation feature.
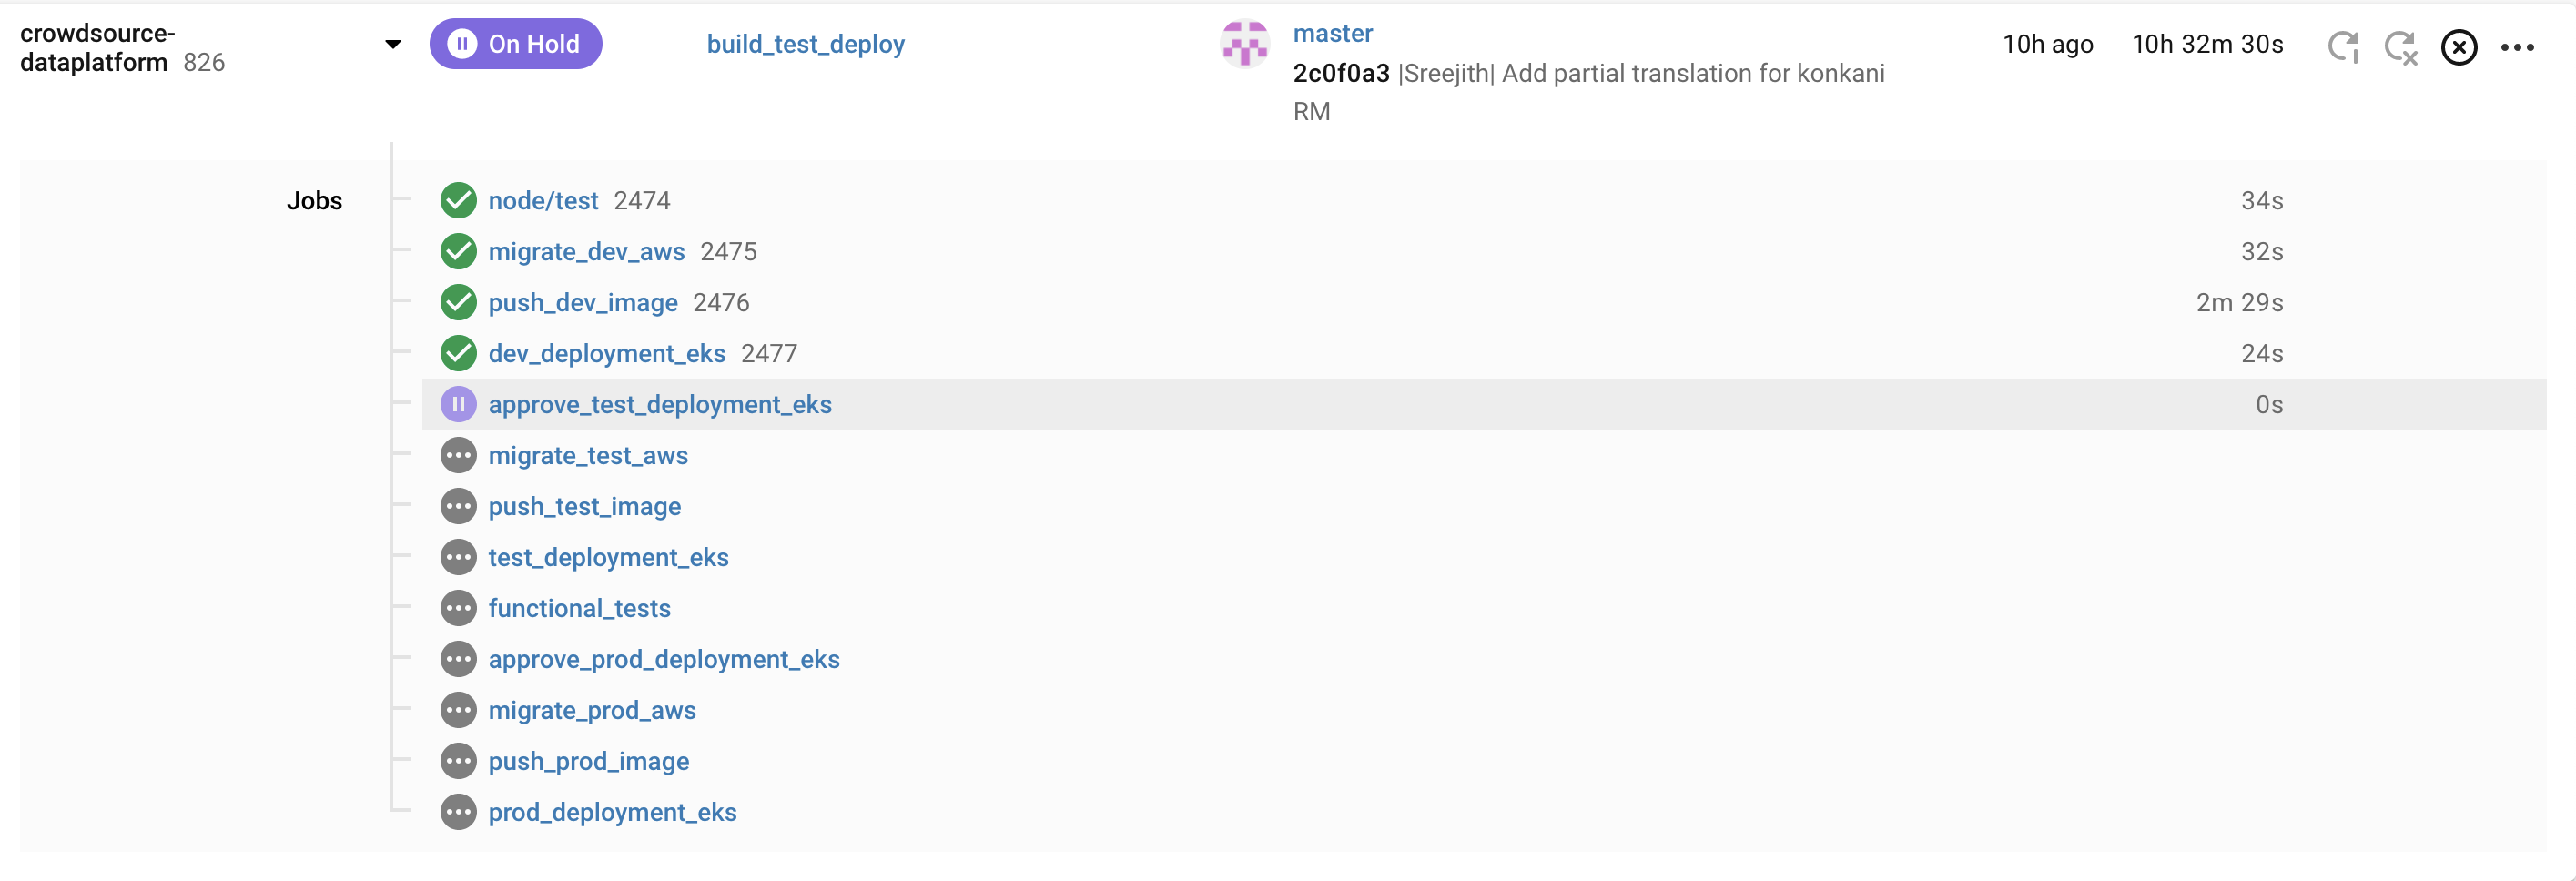
CI/CD
- CircleCI is used for CI/CD.
- Unit tests are run continously for each commit
- Functional Tests are run continously for each commit and act as one if the quality gates before Production deployment
- Automated deployment to K8s for multiple environments
- Database schema changes are done continously and automatically
- Trunk based developement is followed
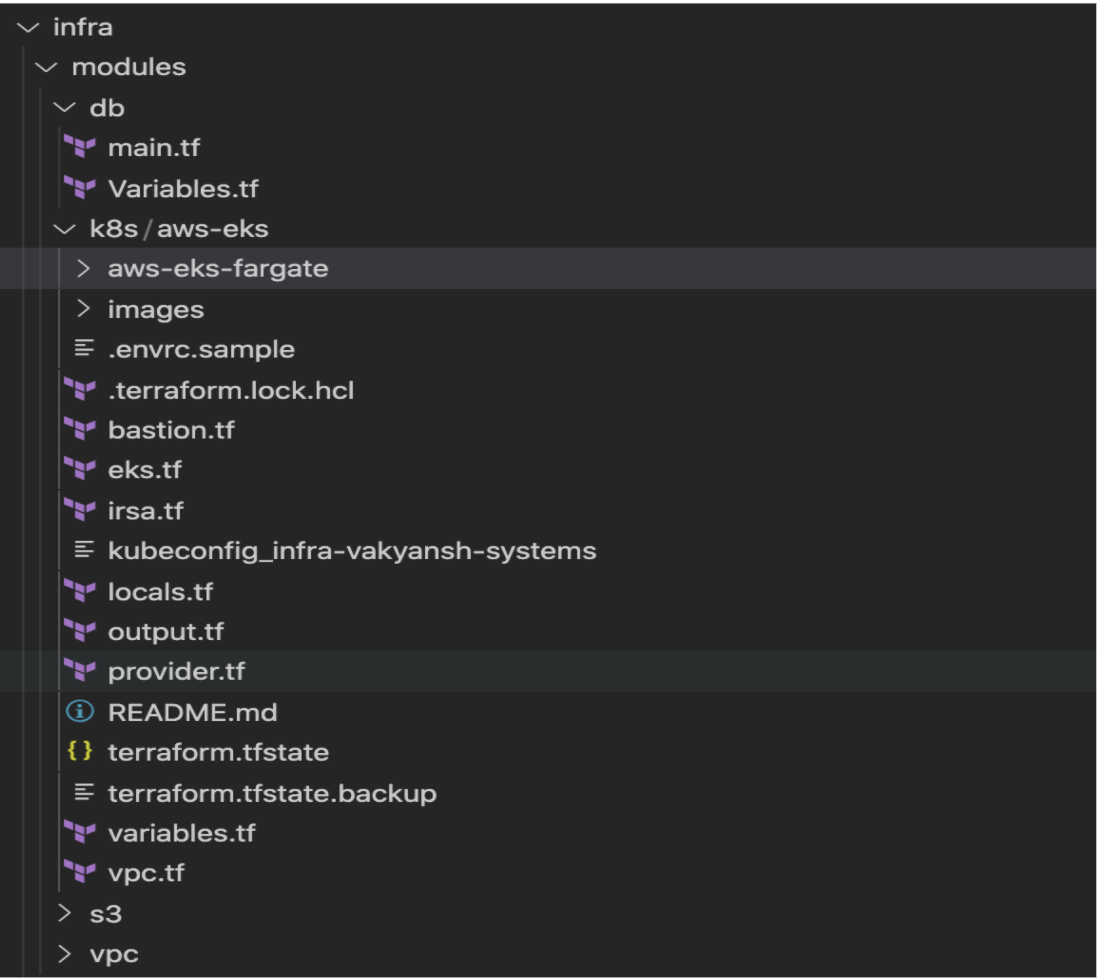
Infrastructure as Code
- Infrastructure defined in code with Terraform and shell scripts
- Easily migrate to another AWS account
- Spin up new env easily
Getting Started
To get started install the prerequisites and clone the repo to machine on which you wish to run the application.
Prerequisites
-
Install
nodelibrary using commands mentioned below. -
For any linux based operating system (preferred Ubuntu):
sudo apt-get install nodejs -
For Mac-os:
brew install node -
Windows user can follow installation steps on https://nodejs.org/en/#home-downloadhead
-
Install or connect to a postgres database
-
Get credentials from google developer console for google cloud storage access/ or aws cli for amazon s3 storage access.
Installation
- Clone the repo using
git clone https://github.com/Open-Speech-EkStep/crowdsource-dataplatform.git
- Go inside the directory
cd crowdsource-dataplatform
- Install node requirements
npm install
Usage
Common configuration steps:
Setting credentials for Google cloud bucket
You can set credentials for Google cloud bucket by running the following command
gcloud auth application-default login
Setting credentials for AWS cloud bucket
You can set credentials for AWS cloud bucket by running the following command
aws configure
Bucket configuration
You can create a specific bucket to store the recorded samples on aws or gcp. And mention those in the environment variables.
Environment file configurations
The following are the variables required to run the application, for running on local these can be added to a .env file
DB_HOST: The host url where your postgres instance is running
DB_USER: The username to access the db
DB_NAME: The database name
DEV_DB_NAME: The database name specific to dev environment
DB_PASS: The database password
BUCKET_NAME: The bucket name configured on aws or gcp
ENCRYPTION_KEY: Key to run unit tests
PORT: Port to run the application on
Running services
Make sure the google credentials are present in project root folder in credentials.json file.
You can run the project using the command
npm run
To run application using a Google cloud bucket
npm run gcp
To run application using a AWS cloud bucket
npm run aws
Database migrations
This package is used to do migrations.
To create the current database structure in your postgres instance, run the following command:
db-migrate up
It would read the configurations from the path
migations/config/migration_config.json
Once can also run the migrate up command by setting an environment variable
DATABASE_URL=postgresql://${DB_USER}:${DB_PASS}@${DB_HOST}/${DB_NAME}
To add a new migration
db-migrate create add-new-table
Using the above command with the --sqlFile flag would create corresponding .sql files in which one can write sql commands to do the operation.
To rollback the last migration, one can
db-migrate down
Documentation for the package can be found here
Testing
Multiple types of tests are continously performed to make sure the application is in healthy state. Pyramid approach is followed with Unit tests at the base and Exploratory tests on top.
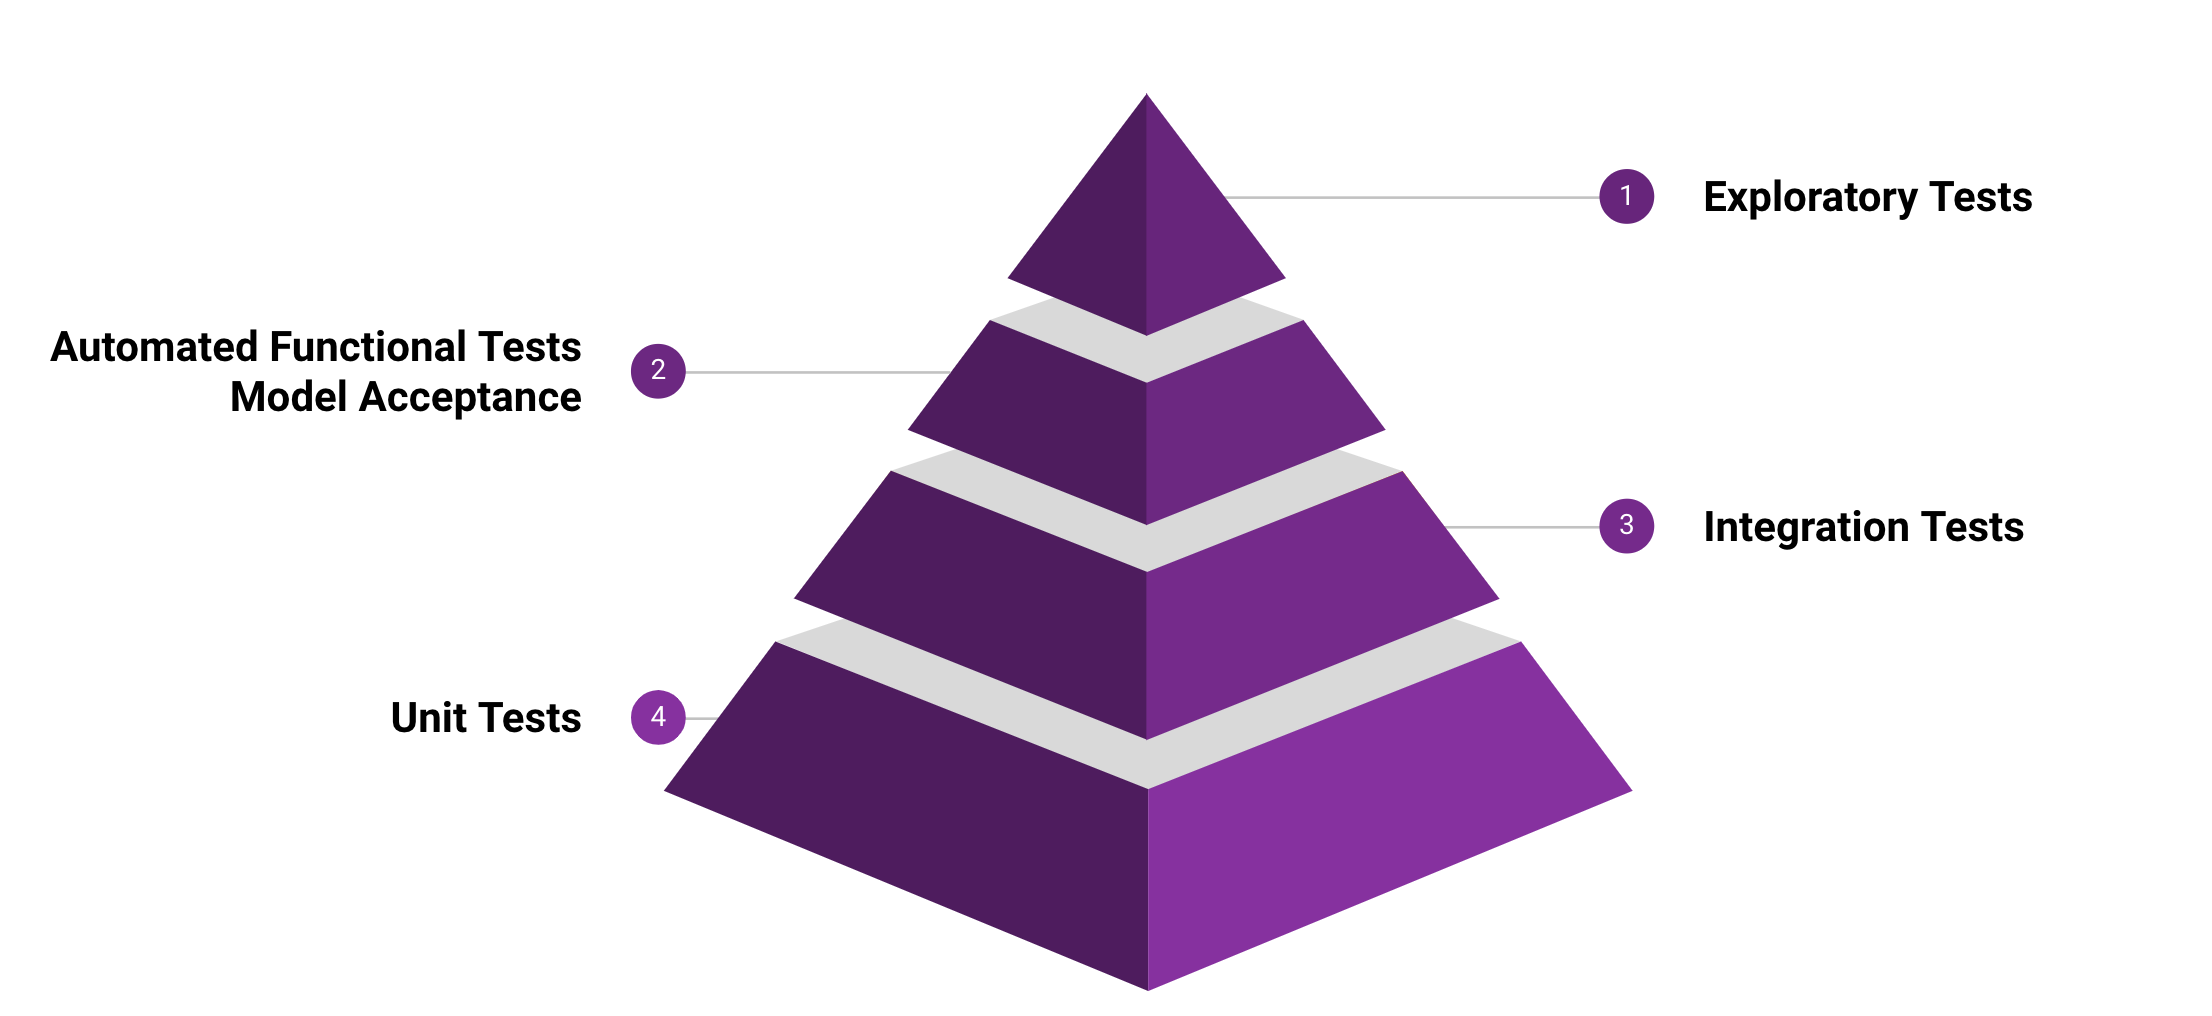
Unit Tests
Unit tests can be run using below command
npm test
Functional Test
Functional tests can be run using below command
npm run functional_test -- --env (test|dev)
Scalabiity Test
Scalabiity tests performed to verify that the system is elastically scalable Below tests were performed
Test Objective: Scalability Test - Validate elastic scalability
Resource Configuration:
Environment: Dev
Pod resources: 0.25 CPU/ 250M RAM
Horizontal Pod Autoscaler :
Scaling Threshold - 10% CPU Utilization
Min pods: 1
Max Pods: 10
Test configuration:
Number of concurrent users: 1000
Total Requests : 15000
Expected: Pods should scale if load increases and CPU utilization goes beyond 10% and should scale down after 5 mins
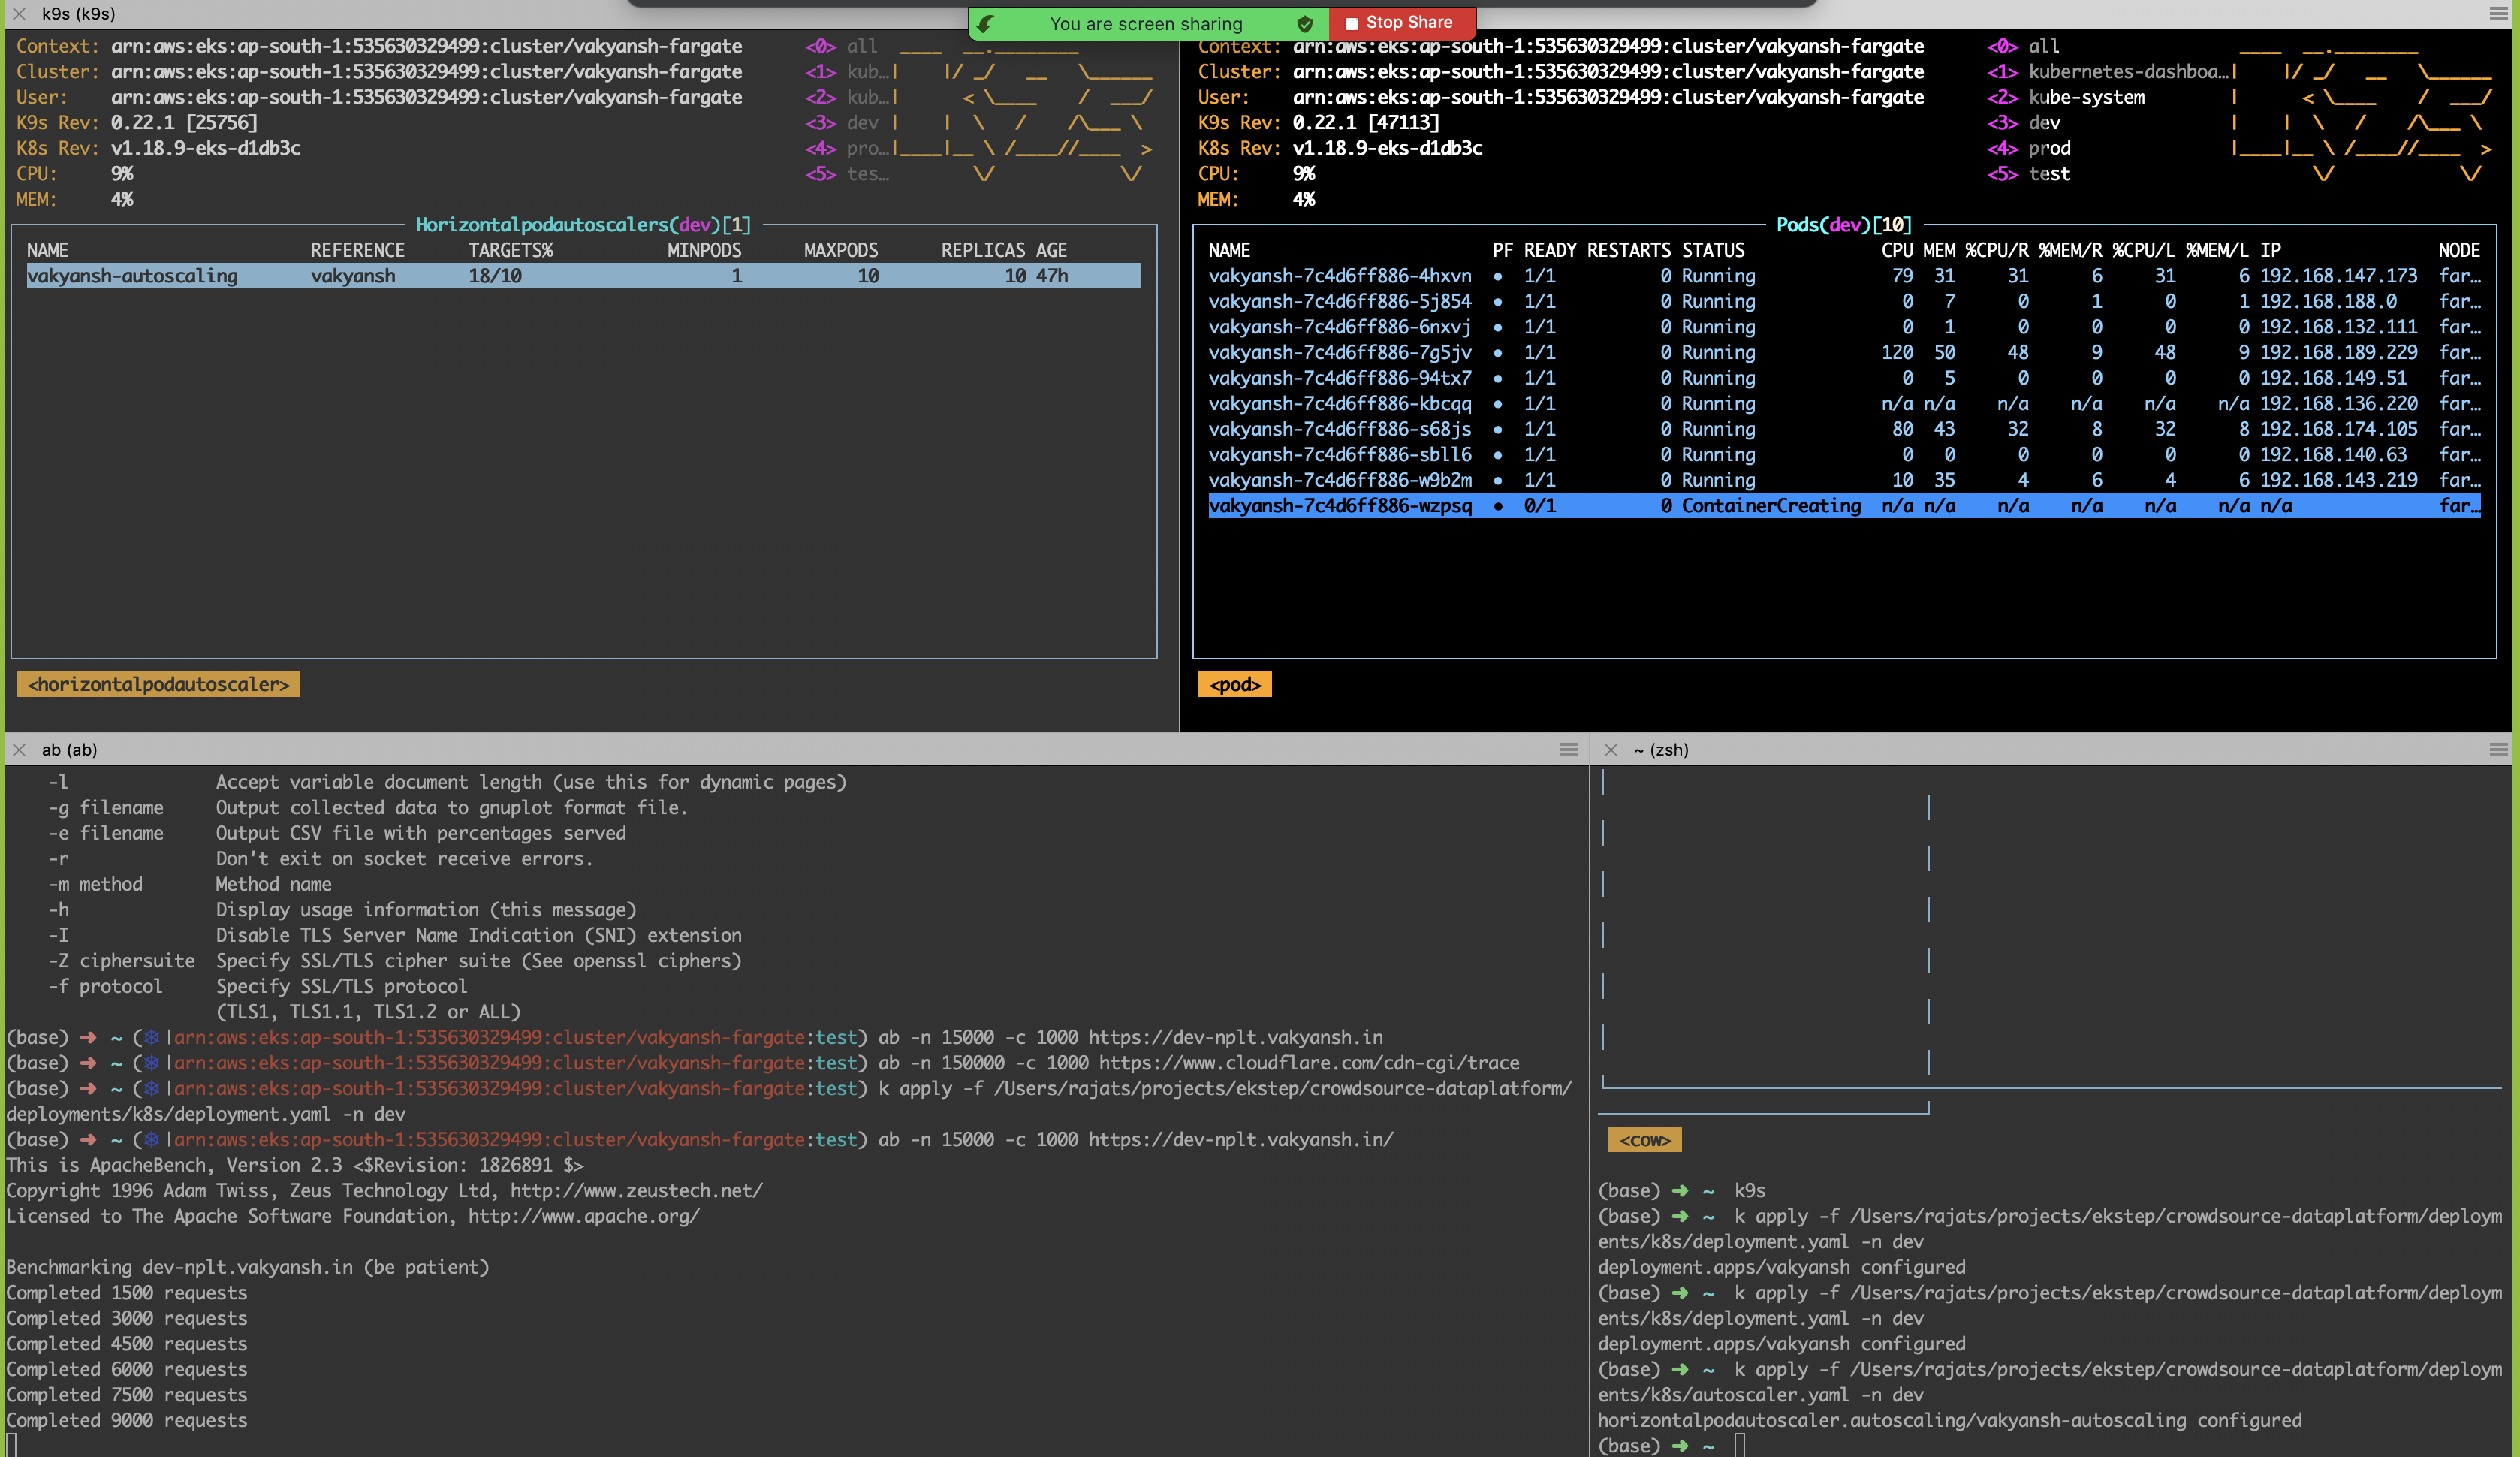
Actual : Pods were scaled up after the CPU utilization went past 10%. Time to scale to desired state was around 2-3 mins
Outcome:
PASSED
As surge started, pods started spinning up 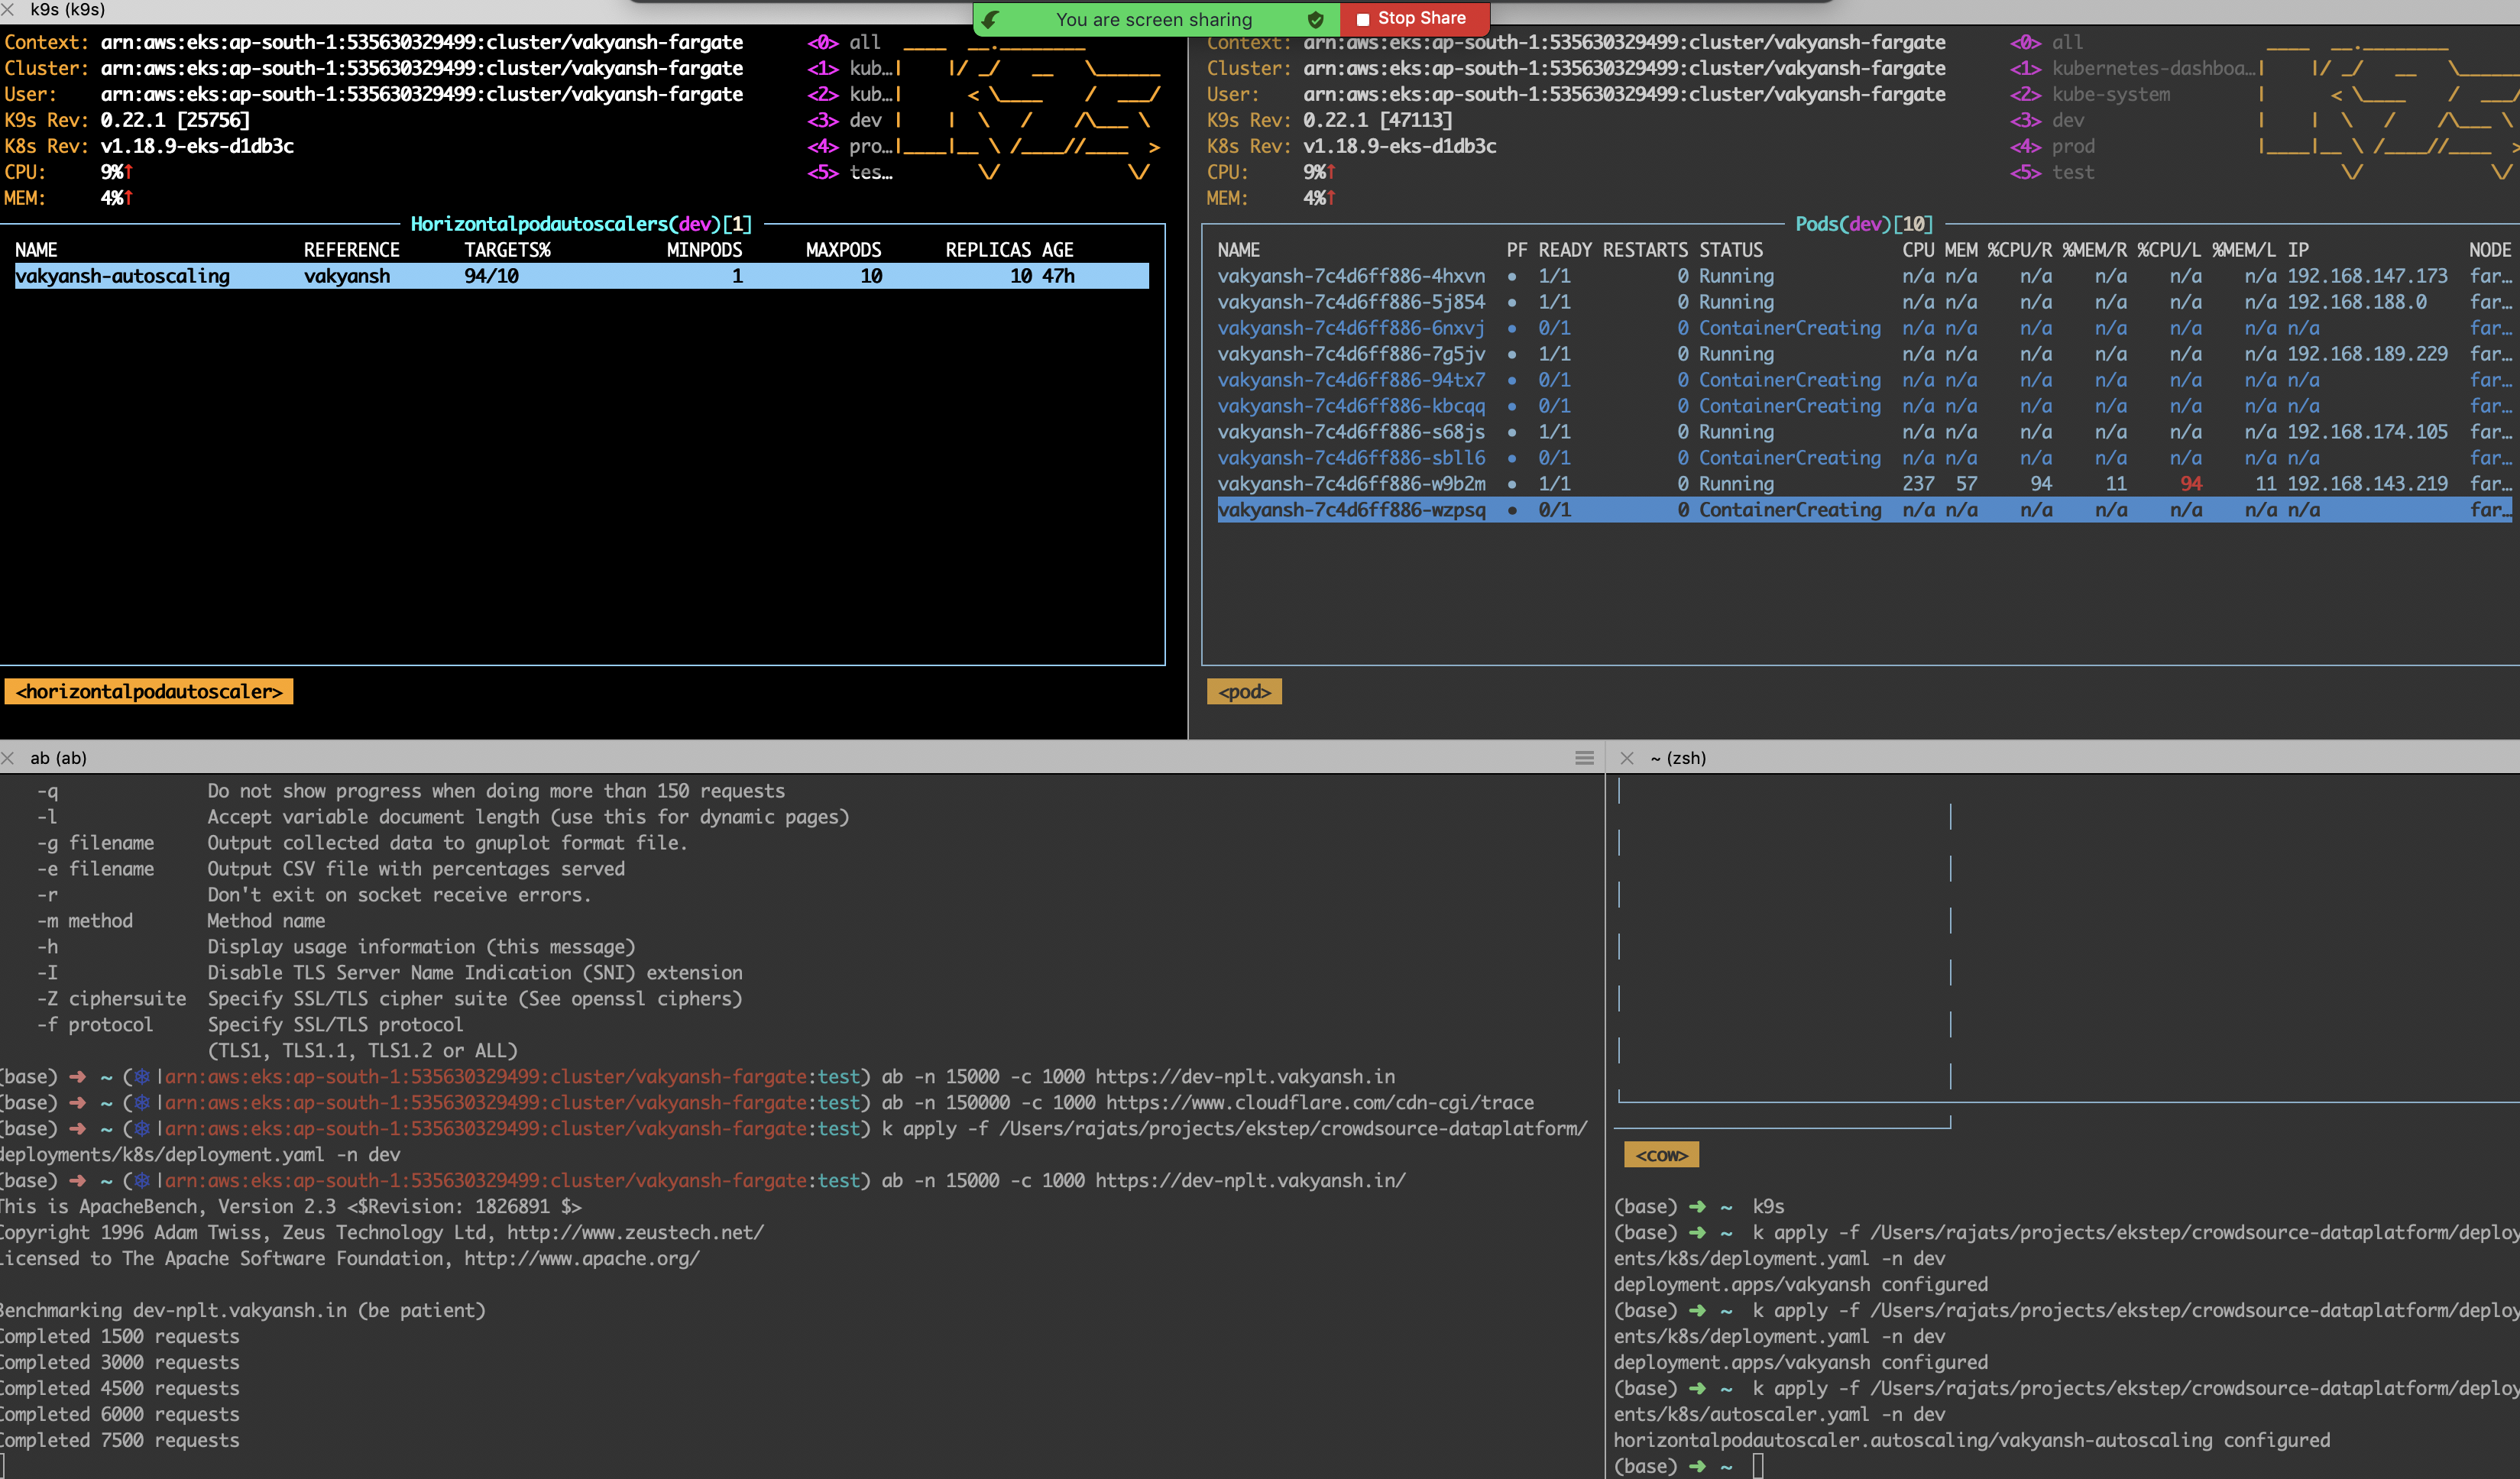
Load Test
Load testing is performed to verify the system is able to handle 5K concurrent users without much impact on latency
Test Objective: Load Test - Validate if application can handle 5K concurrent users
Date: 04/03/2021

Resource Configuration:
  Environment: Test
  Initial Pods: 3
  Pod resources: 2 CPU/ 2GB RAM
  Horizontal Pod Autoscaler :
    Scaling Threshold - 40% CPU Utilization
    Min pods: 3 , Max Pods: 10
  Database CPU : 4

Test configuration:
Number of concurrent users: 20000
Requests per user : 3
Ramp up time: 10 sec
Iterations: 3
Outcome:
PASSED
ELB stats: 
Database stats: 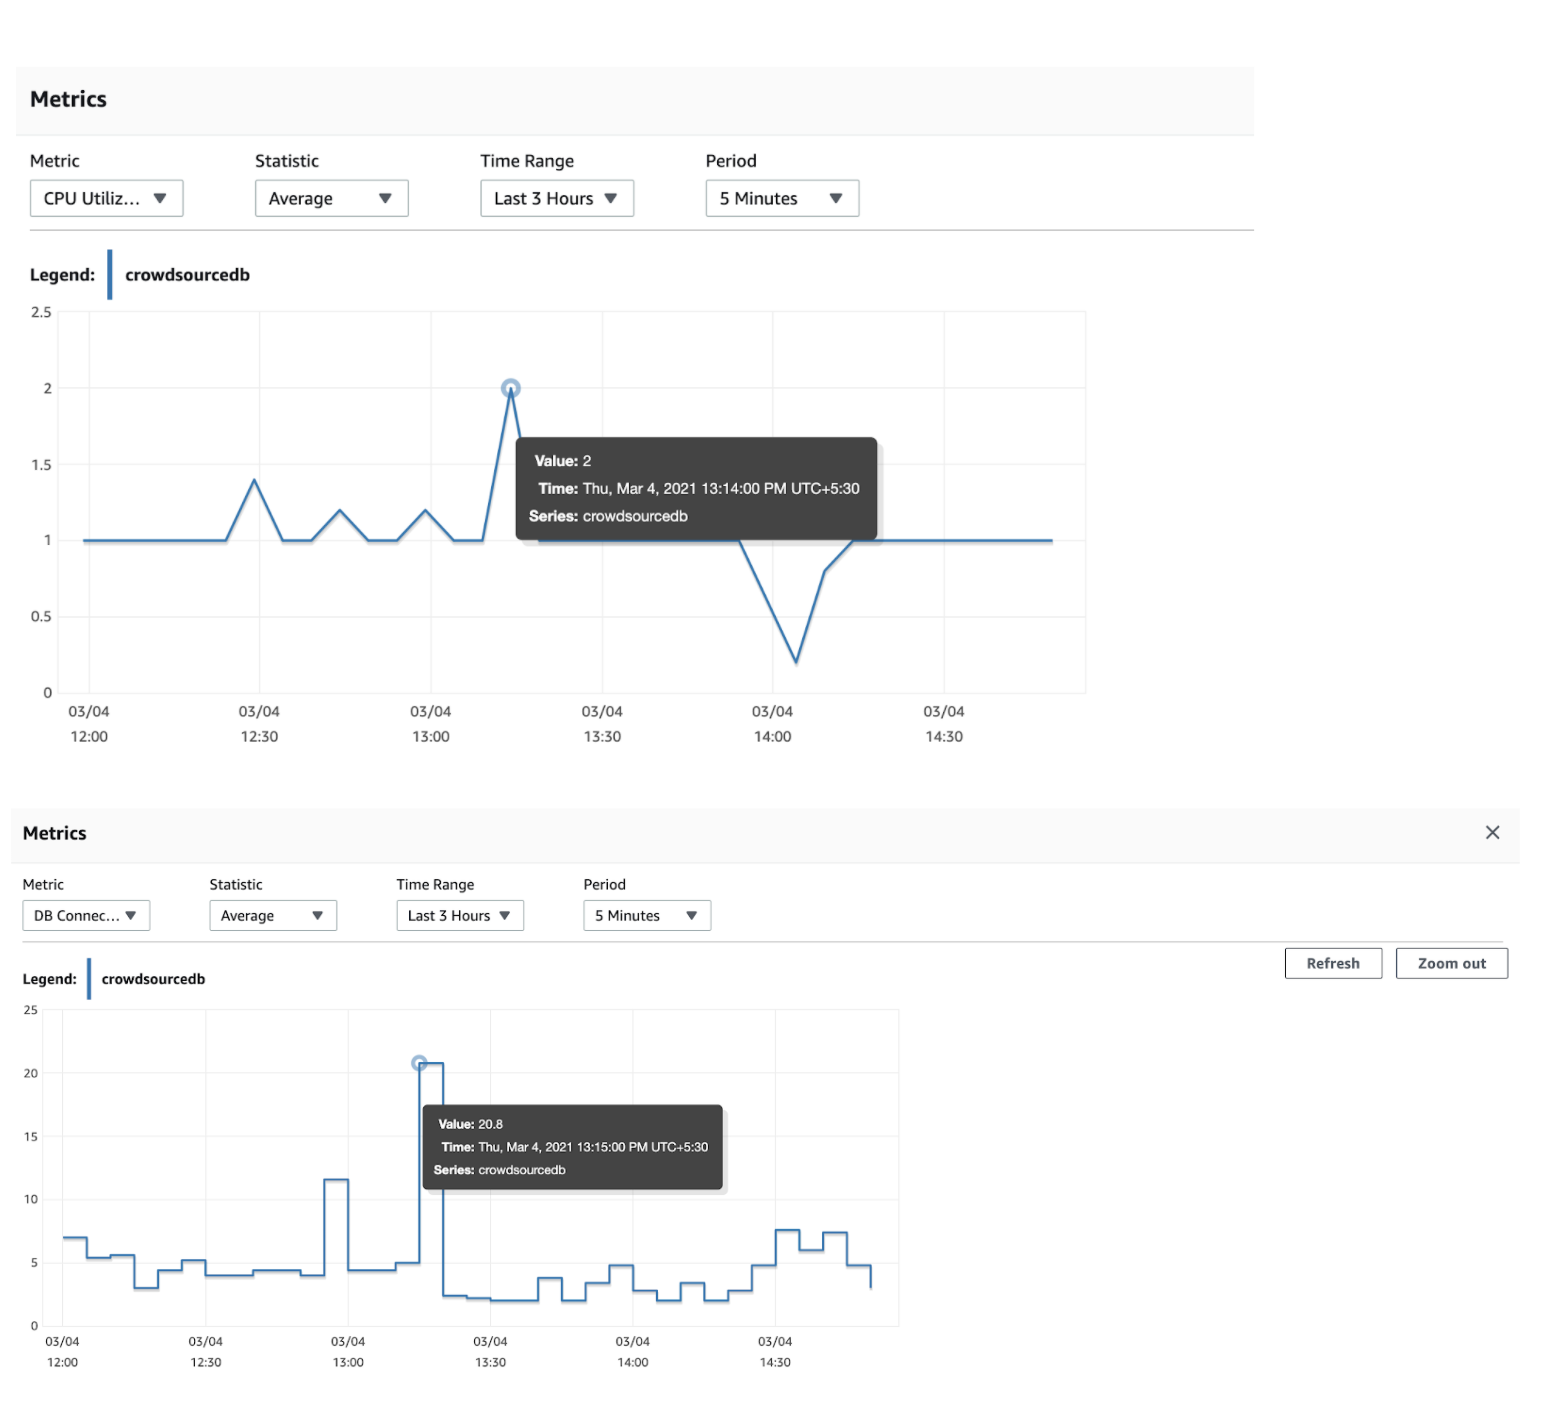
Jmeter stats: 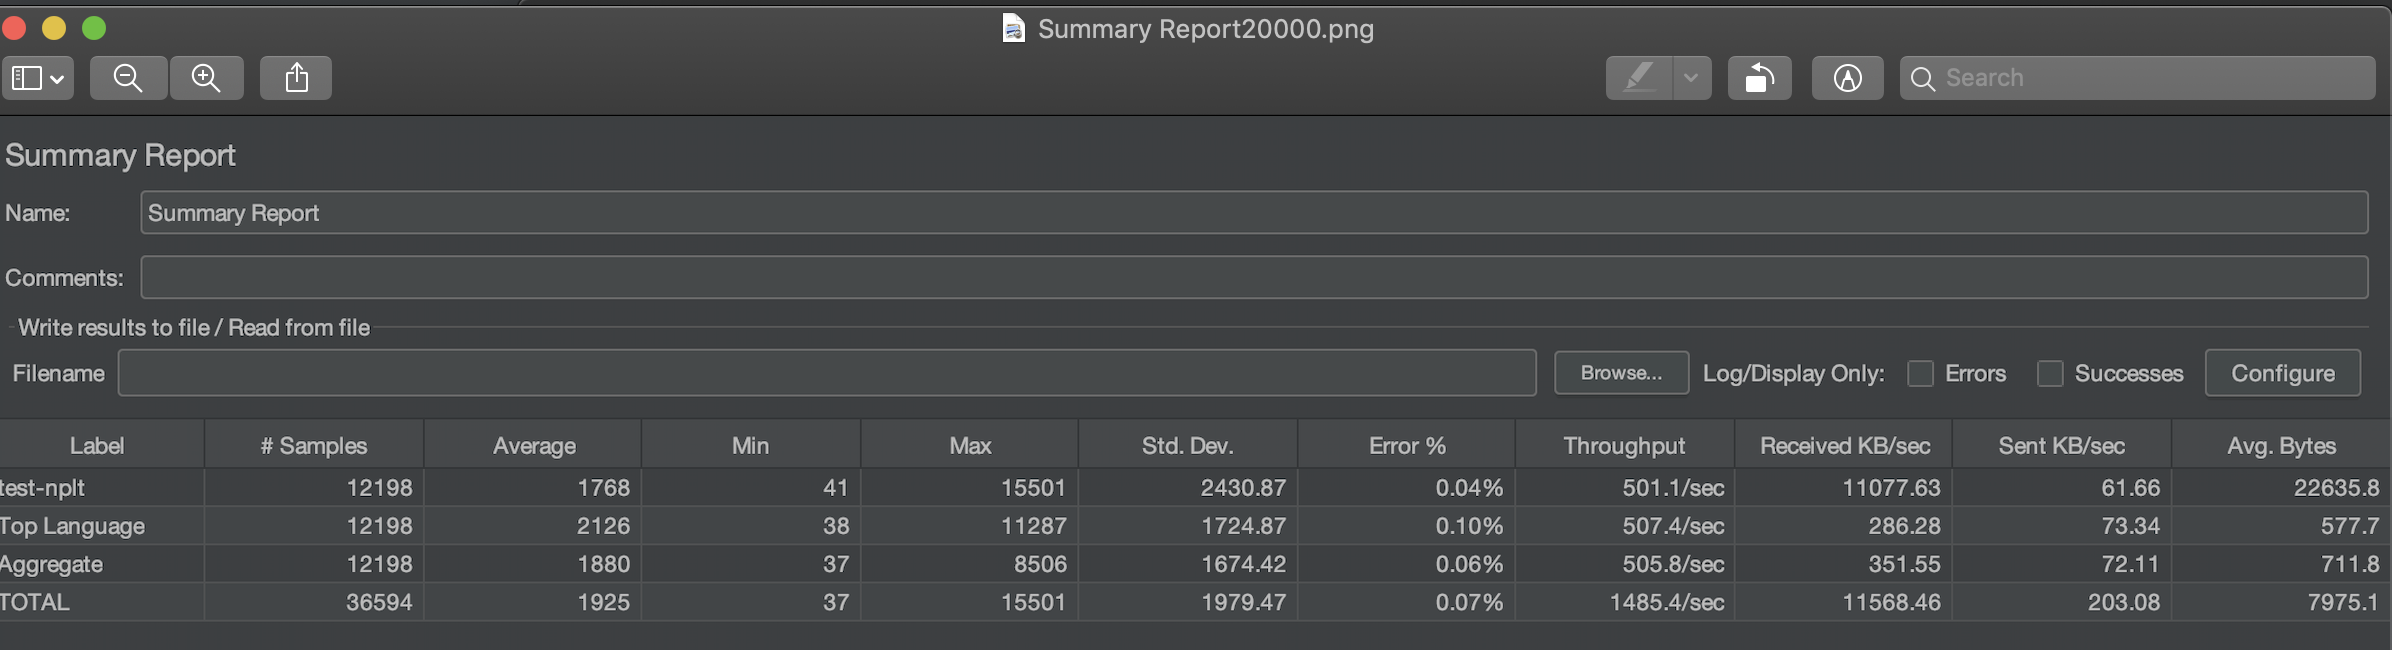
Summary:
- This test had 20000 users ramped up within 1 min (3 times).
- The test was performed from a single machine so 20K concurrent users could scale in 1 min.
- All the requests were served within initial resources, no scaling was triggered.
- All three endpoints served response in around 2 sec on an average.
- The system was able to handle upto 12K concurrent users.
- There were some errors thrown by AWS Load balancer may be due to single IP requests.
- Database could handle the load and no connection leak is observed
Security
Security first approach is taken while building this application. The OWASP top 10 are ingrained in the application security DNA. Please reach out to srajat@thoughtworks or heerabal@thoughtworks.com for more information around Security
Running cost estimates
Cloud : AWS
Amazon RDS (4 CPU): $400
WAF: $30
EKS + Fargate: $75 + $225 = $300
ELB: $150
Others: $200

Total: ~ $1100-1200 per month
Architecture Decision Records
Decision records are maintained HERE
Contributing
Contributions are what make the open source community such an amazing place to be learn, inspire, and create. Any contributions you make are greatly appreciated.
- Fork the Project
- Create your Feature Branch (
git checkout -b feature/AmazingFeature) - Commit your Changes (
git commit -m 'Add some AmazingFeature') - Push to the Branch (
git push origin feature/AmazingFeature) - Open a Pull Request
Walkthrough Videos
Link: https://drive.google.com/drive/folders/0AKaMc31idTcZUk9PVA
License
Distributed under the [MIT] License. See LICENSE for more information.
Git repository
https://github.com/Open-Speech-EkStep/crowdsource-dataplatform/
Contact
Connect with community on Gitter
Project Link: https://github.com/Open-Speech-EkStep/crowdsource-dataplatform/