Intelligent Data Pipeline
About The Project
Intelligent Data Pipelines are built to create the audio data set that can be used for Speech Recognition deeplearning models. The aim is to allow easy, quick and fast dataset generation without doing manual work.
It splits data into smallers utterences which are understood well by deeplearning models. The data is then cleansed based on 'Signal to Noise ratio'. The audio analysis is performed using pre trained models and clustering based on audio features (see Resemblyzer for more details).
It leverages Kubernetes for parallel computing and below are the metrics we have acheived so far:
Some stats for a language with 1000 hrs raw data
-
Raw data 1000 hrs
-
Time taken: 2-3 days
-
Final Usable Data of Pretraining: 600
-
Final Usable Data of Fine Tuning: 400
Getting Started
The developer documentation helps you to get familiar with the bare necessities, giving you a quick and clean approach to get you up and running. If you are looking for ways to customize the workflow, or just breaking things down to build them back up, head to the reference section to dig into the mechanics of Data Pipelines.
To get started install the prerequisites and clone the repo to machine on which you wish to run the framework.
Here is the code
Architecture
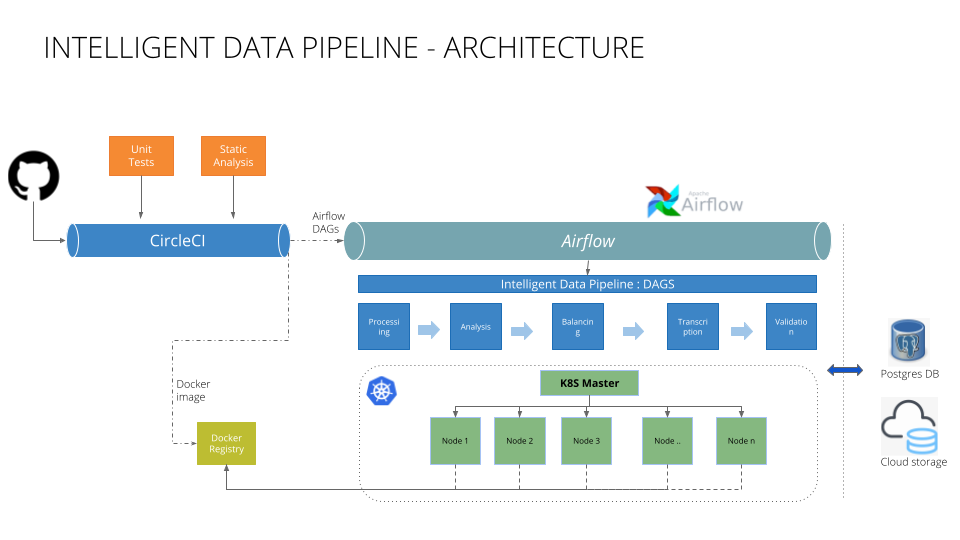
Intelligent Data Pipeline - Jobs
Audio Processor
Audio Processor job takes raw data generted from Data Collection Pipeline or it also consumes data that is generated by any other means. It converts raw data file to wav file, then it splits wav file into smaller audio chunks. Then 'Signal to Noise Ratio (SNR)' is generated for each audio chunk and then filtration is performed based on the 'Signal to Noise Ratio (SNR)'. The threshold can be configured through configurations file. It then adds audio metadata to the catalogue (PostgresDB).
Audio Analysis
Audio Analysis job takes processed and filtered audio chunks generated from Audio Processor job and performs three type of analysis:
Language identification
It predicts the language spoken in each audio chunk using a pre-trained language identification model for a language. It gives the confidence score of the language for each audio chunk. Please see this for more details.
Speaker Clustering
It estimates the total number of speakers in a particular source and maps speaker to audio chunks. That mapping of speaker to audio chunk is required for data balancing. Please see this for more details.
Gender identification
It predicts the speaker gender for each audio chunk using a pre-trained gender identification model. Please see this for more details.
Audio Data Balancing
The model training data requires data with proper gender ratio. Also, the data should be balanced based on speaker duration. It also provides capability to filter and choose data based on certain metadata filter criteria.
Audio Validation
The data that goes into model training should be of good quality. This job validates data that is not adhereing to quality standards required by the model. It generates csv reports that can be analysed by data scientists to further filter out the best data for model training.
Audio Transcription
For model fine-tuning, the paired audio data is required (audio with labeled text). This job generates text for each audio chunk using Google or Azure API's. The texts generated are further sanitized based on the rules defined for the language.
Installation
-
Clone the repo
git clone git@github.com:Open-Speech-EkStep/audio-to-speech-pipeline.git -
Install python requirements
pip install -r requirements.txt
Run on Kubernetes
Using Composer
Requirements
-
Terraform https://www.terraform.io/downloads.html
-
kubectl https://kubernetes.io/docs/tasks/tools/install-kubectl-linux
Infra Setup
-
Clone the repo:
git clone https://github.com/Open-Speech-EkStep/ekstep-deep-speech-infra.git -
Initialize terraform modules
terraform init -
Select a workspace as per the environments(dev,test,prod).
eg:terraform workspace select <env_name>terraform workspace select prod -
Configure
variable "project" { description = "The name of the Google Cloud Project." default = "<project-name>" } variable "composer_env_name" { description = "The name of the Google composer_env_name." default = "ekstepcomposer" } variable "script_path" { description = "The path of the working dir." default = "./modules/gcp-composer/" } variable "bucket_name" { description = "The name of the gcp bucket" default = "<bucket-name>" } variable "database_version" { description = "The name of the database_version." type = string default = "POSTGRES_11" } variable "database_instance_name" { description = "The name of the database_instance." type = string default = "<db-instance-name>" } variable "db_region" { description = "The name of the db region." type = string default = "us-central1" } variable "database1" { description = "The name of the database1." type = string default = "speech_recognition_data_catalog-1" } variable "database2" { description = "The name of the database2." type = string default = "speech_recognition_data_catalog-2" } variable "speechrecognition_service_account" { description = "The name of the speechrecognition_service_account." type = string default = "service-account-1" } variable "circleci_service_account" { description = "The name of the circleci_service_account." type = string default = "servacct-circleci" } variable "sql_instance_size" { default = "db-custom-2-7680" type = string description = "Size of Cloud SQL instances" } variable "sql_disk_type" { default = "PD_HDD" type = string description = "Cloud SQL instance disk type" } variable "sql_disk_size" { default = "20" type = string description = "Storage size in GB" } -
Create Service account:
terraform apply -target=module.service-accounts -
Create keys from console.cloud.google.com
-
Set env variable
export GOOGLE_APPLICATION_CREDENTIAL_SERVICE_ACC= </path/to/key.json> -
Run specific modules as per requirements.
eg:terraform apply -target=module.<module-name>terraform apply -target=module.sql-database -
Run all modules at once.
terraform apply -
Connect to Database from local: Setup proxy
Create username and password from console. Then connect to localhost./cloud_sql_proxy -dir=./cloudsql -instances=<project-id>:<zone>:<db-instance-name>=tcp:5432 -
Whitelist composer worker IP in Database Network.
CI/CD setup
Once you pull code you have to configure some variable in your CircleCI. So that while deploying code image should easily push into google container registry.
1. GCP_PROJECT # Name of your GCP project
2. GOOGLE_AUTH # Service account key that is created using terraform
3. POSTGRES_DB # Database host ip that is created using terraform
4. POSTGRES_PASSWORD  # Database password
5. POSTGRES_USER # Database user name
6. DB_INSTANCE # Database instance name
Audio Processing Config
Description
Create a yaml file using following config format and configure paths and other parameters.
Config
config:
  common:
    db_configuration:
        db_name: ''
        db_pass: ''
        db_user: ''
        cloud_sql_connection_name: '<DB Host>'

    gcs_config:
      # master data bucket
      master_bucket: '<Name of the bucket>'

  audio_processor_config:

    # feat_language_identification should true if you want run language identification for a source
    feat_language_identification: False
    # language of the audio
    language: ''

    # path of the files on gcs which need to be processed
    # path eg: <bucket-name/data/audiotospeech/raw/download/downloaded/{language}/audio>
    remote_raw_audio_file_path: ''

    # after processing where we want to move raw data
    snr_done_folder_path: '' # <bucket-name/data/audiotospeech/raw/download/snr_done/{language}/audio>

    # path where the processed files need to be uploaded
    remote_processed_audio_file_path: '' # <bucket-name/data/audiotospeech/raw/download/catalogue/{language}/audio>

    # path where Duplicate files need to be uploaded based on checksum
    duplicate_audio_file_path: '' # <bucket-name/data/audiotospeech/raw/download/duplicate/{language}/audio>

    chunking_conversion_configuration:
      aggressiveness: '' # using for vad by default it's value is 2 the more the value that aggressive vad for chunking audio
      max_duration: ''   # max duration is second if chunk is more than that vad will retry chunking with inc aggressiveness

    # SNR specific configurations
    snr_configuration:

      max_snr_threshold: '' # less than max_snr_threshold utterance will move to rejected folder.
      local_input_file_path: ''
      local_output_file_path: ''
Steps to run:
-
We have to configure sourcepathforsnr in airflow variable where our raw data is stored.
-
Other variable that we need to configure is snrcatalogue in that we need to add our source(s) name which we want to process and following parameters:
- count: Count of files that we want to process in one trigger.
- format: The format of the raw audio file in bucket.
- language: Language of source(s).
- parallelism: Number of pods that will be up in one run. If parallelism is not defined then number of pod = count.
-
ex: -
"snrcatalogue": {
  "<source_name>": {
  "count": 5,
  "format": "mp3",
  "language": "telugu",
  "parallelism":2
   },
  "<other_source_name>": {
  "count": 5,
  "format": "mp3",
  "language": "telugu",
  "parallelism":5
   }
 }
- We have to also set audiofilelist with whatever source(s) we want to run with empty array that will store our file path ex:-
"audiofilelist": {
    "<source_name>": [], "<other_source_name>": []
    }
- That will create a DAG with the source_name(s) now we can trigger that DAG, that will process given number(count) of file and upload processed file to remote_processed_audio_file_path that we mentioned in the config file. And move raw data from remote_raw_audio_file_path to snr_done_folder_path. Also, Database will be updated with the metadata which we created using CircleCI.
Audio Analysis Config
Config
audio_analysis_config:

analysis_options:

  gender_analysis: 1 # It should be 1 if you want run gender analysis for a source else it should be 0.
  speaker_analysis: 0 # It should be 1 if you want run speaker analysis for a source else it should be 0.

  # path where the processed files need to be uploaded
  remote_processed_audio_file_path: '' # <bucket-name/data/audiotospeech/raw/download/catalogued/{language}/audio>

  # path where the embeddings need to be uploaded
  path_for_embeddings: '' # <bucket-name/data/audiotospeech/raw/download/catalogued/{language}/embeddings/>

  min_cluster_size: 4 # It is least number of cluster for one speaker.
  partial_set_size: 15000 # Number of audio chunks to create embeddings for a given source.
  fit_noise_on_similarity: 0.77
  min_samples: 2
Steps to run
- We have to configure audio_analysis_config in airflow variable using this json, we have to mention source name, language, parallelism and batch size.
"audio_analysis_config" : {
    "<source name>" : {
    "language" : "hindi",
    "format": "wav",
    "parallelism": 5,
    "batch_size": 5000
     }
}
- That will create a audio_analysis DAG with name source_name_audio_embedding_analysis. Now, we can trigger that DAG and that will process given sources. It will create embeddings, processed files and upload them to path_for_embeddings and remote_processed_audio_file_path respectively that we have mentioned in config file. Also, Database will be updated with the metadata which we created using CircleCI.
Data Balancing Config
config
data_tagger_config:
# path of to the folder in the master bucket where the data tagger will move the data to
landing_directory_path: '' #'<bucket_name>/data/audiotospeech/raw/download/catalogued/{language}/audio'

# path of to the folder in the master bucket from where the data tagger will pick up the data that needs to be moved
source_directory_path: '' #'<bucket_name>/data/audiotospeech/raw/landing/{language}/audio'
Steps to run:
-
We need to configure data_filter_config airflow variable for each source. We provide 2 modes of data filtration file mode and filter mode. Only, one mode can be used at a time. To use filter mode, "file_mode": "n". If "file_mode": "y", then snr filter, duration filter etc. won't work.
-
data_set: select data set type from 'train' and 'test'.
-
file_mode: It should be 'y' if you want to use file_mode for a source else it should be 'n'. This mode can be used when we need to filter out some specific files that we found after analysis by providing path of the CSV file in file_path parameter.
-
file_path: path of the CSV file
-
We have multiple filters:
- by_snr: filter based on SNR value. "lte" means lower than and "gte" means greater than
- by_duration:total duration from a given source.
- by_speaker: we can configure how much data per speaker we want.
- by_utterance_duration: we can required duration of utterance.
- exclude_audio_ids: we can pass a list of audio_ids that we want to skip.
- exclude_speaker_ids: we can pass a list of speaker_ids that we want to skip.
- with_randomness: It is a boolean value if it's true it will pickup random data from DB.
-
ex: -
-
"data_filter_config": {
    "test_source1": {
      "language": "hindi",
      "file_mode": "n",
      "data_set": "train",
      "file_path": "data/audiotospeech/raw/download/duplicate/test_source1.csv",
      "filter": {
        "by_snr": {
          "lte": 75,
          "gte": 15
        },
        "by_duration": 2,
        "with_randomness": "true"
      }
    },
    "test_source2": {
      "language": "hindi",
      "file_mode": "n",
      "data_set": "train",
      "file_path": "data/audiotospeech/raw/download/duplicate/test_source2.csv",
      "filter": {
        "by_speaker": {
          "lte_per_speaker_duration": 60,
          "gte_per_speaker_duration": 0,
          "with_threshold": 0
        },
        "by_duration": 2
    }
  }
}
- After configuring all values, one DAG will created data_marker_pipeline we can trigger that DAG. This DAG will filter out all audio chunks on the basis of
the given criteria's and it will pick audio chunks from source_directory_path. After filtration, audio chunks will be moved to landing_directory_path.
Audio Transcription (with config):
config:
config:
  common:

    db_configuration:
        db_name: ''
        db_pass: ''
        db_user: ''
        cloud_sql_connection_name: '<DB host>'

    gcs_config:
      # master data bucket
      master_bucket: '<bucket name>'

    azure_transcription_client:
      speech_key: '<key of the api>'
      service_region: 'centralindia' # service region

    google_transcription_client:
      bucket: '<bucket name>'
      language: 'hi-IN' # It is BCP-47 language tag with this we call STT api.
      sample_rate: 16000 # Sample rate of audio utterance
      audio_channel_count: 1 #The number of channels in the input audio data

  audio_transcription_config:
  # defaults to hi-IN

  language: 'hi-IN' # language

  # audio_language it's used for sanitization rule whichever language you choose you need to add a rule class for the same.
  # You can use reference of hindi sanitization
  # sanitization rule eg: empty transcription, strip, char etc

  audio_language: 'kannada'

  # Bucket bath of wav file
  remote_clean_audio_file_path: '<bucketname>/data/audiotospeech/raw/landing/{language}/audio'

  # path where the processed files need to be uploaded
  remote_stt_audio_file_path: '<bucketname>/data/audiotospeech/integration/processed/{language}/audio'
Steps to run:
-
We have to configure sttsourcepath in airflow variable where our filtered audio chunks are stored.
-
Other variable is sourceinfo in that we update our source(s) which we want to process through Speech-to-Text API (STT).
- count: Count of files that we want to process in one trigger.
- stt: STT API we want to use for transcription generation. We have support for Google & Azure STT API and you can add rapper as well for other API's.
- language: Language of source(s).
- data_set: Category of data "train" or "test".
-
ex: -
"sourceinfo": {
  "<source_name>": {
  "count": 5,
  "stt":"google"
  "language": "telugu",
  "data_set":"train"
  },
  "<source2_name>": {
  "count": 5,
  "stt":"google"
  "language": "telugu",
  "data_set":"train"
  }
}
- We have to also set audioidsforstt and with source(s) we want to run with empty array that will store audio_id. ex:
"audioidsforstt": {
    "<source_name>": [], "<source2_name>": []
}
- Also, configure integrationprocessedpath variable with the path of folder where we want move transcribed data.
integrationprocessedpath: ''
- That will create a DAG with the source_name now we can trigger that DAG. And that will process given number(count) of audio chunks and upload processed files to remote_stt_audio_file_path that we mentioned in config file. Also, it will move raw data from remote_clean_audio_file_path to integrationprocessedpath and database will be updated with the metadata which we created using CircleCI.
Tutorials Reference
- https://www.youtube.com/watch?v=VPZfntRpNqQ&list=PLA97EDXt7HiUF56ueLGPk3WixYmKC4QGe&index=10
- https://www.youtube.com/watch?v=PyAn2FDYeOQ&list=PLA97EDXt7HiUF56ueLGPk3WixYmKC4QGe&index=13
- https://www.youtube.com/watch?v=eOiBPH9MZ6Q&list=PLA97EDXt7HiUF56ueLGPk3WixYmKC4QGe&index=14
- https://www.youtube.com/watch?v=X-etVH5yvX4&list=PLA97EDXt7HiUF56ueLGPk3WixYmKC4QGe&index=15
Contributing
Contributions are what make the open source community such an amazing place to be learn, inspire, and create. Any contributions you make are greatly appreciated.
- Fork the Project
- Create your Feature Branch (
git checkout -b feature/AmazingFeature) - Commit your Changes (
git commit -m 'Add some AmazingFeature') - Push to the Branch (
git push origin feature/AmazingFeature) - Open a Pull Request
We follow conventional commits
License
Distributed under the [MIT] License. See LICENSE for more information.
Git Repository
https://github.com/Open-Speech-EkStep/audio-to-speech-pipeline
Contact
Connect with community on Gitter